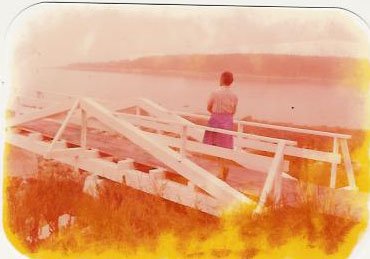
Here is a photo which I altered during my first bleach photo experiment.
Step 1: I cut the corners with a die cutter, to round them off.
Step 2: Immersed in warm water and bleach solution (approximately 5:1 ratio)until I saw the edges turning white, then removed and...
Step 3: Immersed in cold water solution, allowed to soak for about 30 seconds, then removed and...
Step 4: Immersed in cold water solution, allowed to soak for about 30 seconds.
Step 5: Removed and shook off excess water.
Step 6: Laid flat on paper towel to dry overnight.
I removed this photo from the water right before all the blue emulsion was off. The sky was foggy and grey, and the lake water was dark grey, so there was no blue to be removed from those, but you CAN see a little blue left in the skirt.
I could not control the way the photo was altered, such as having no control over the parts which are yellow near the bottom. The parts that are in the bleach solution longer get bleached out faster. I think that what happened with this was I put the photo into the bleach/water bath bottom side in first then got the rest of it submerged. If you want a more uniform look you will have to try to dunk it under the surface as fast as possible, all at the same time (if that is possible). If you casually plunk it in the water and leave it so that part of it is dry and floating on the top while the rest is in the solution then the photo will be greatly affected (less uniform in appearance).
One really fun part of altering photos with bleach is that you never know exactly what will happen during the process.
I like the fact that the only blue left in the photo is the skirt. Most of the colors of this photo are the yellow and red tones. Note that the edges are completely bleached out to the color white, which means that all of the photo's emulsion has been removed and what you see is actually the white background paper.
If you want the photo to have the edges all look like this, then you should cut the photo to its' final size before you bleach it. In other words if you like the effect on the edge having that white border effect, but you want the photo's finished size to be smaller, crop and cut the photo to size first, then do the bleach altering.
An example is if you want the corners to have a different edge than they have originally, do the cropping before you alter it.
I wonder what the effect would look like if one of the fancy design die cutters were used on it?
Technorati Tags: altered imagery, altered photo, photography.

No comments:
Post a Comment