A few months ago I saw some dominoes altered. I swear it was on the Carol Duvall show with Tim Holz but I am not able to find the directions on the HGTV website. Did I dream it? I recall that he used either alcohol inks or water based markers to color the dominoes, then rubber stamped upon them, then hinged two together to make a mini-journal. Cardstock was used to make pages for the interior of the tiny journal and to finish it off it was hung from a cord to be worn as a necklace--a mini journal necklace.
Anyway with that in mind one day I was in a dollar store and saw a set of dominoes in the toy section. I bought one set. On another day I saw another set of 30 in a dollar store, these were smaller sized, so I bought that. I put them away for another day.
Yesterday I was reading on the Cherry Pie art stamp chat list about altering dominoes. Someone shared directions to use pigment based ink. The directions were this:
1. Rough up the domino with sandpaper on all surfaces.
2. Color the background with pigment dye ink.
3. Heat set the background with a heat gun.
4. Add rubber stamped images with pigment dye ink.
5. Heat set that.
6. Color the sides with metallic marker.
If you wanted a hole drilled through the domino so it could be worn as a necklace or attached to something with a string or thread or cord then the first step would have been to drill a hole through the domino. I skipped that step as my husband was not available to do that drilling for me.
Caution: the heat gun and the drill will heat up the plastic domino.
Today my son is still sick and woke me at 4:00 a.m. I was unable to get back to sleep so I got up and decided to tackle altering dominoes.
I followed the above directions but I used Color Box Chalk Ink instead of pigment dye ink. Instead of step #6 I used the chalk ink on the sides, the same color as the background. I am now considering either using the ink that the top design color was on the sides instead. I could still color the sides with a marker but for these designs I am not sure a gold metallic finish would look best on it. I was also thinking of going back and applying rubber stamped images to the sides, either tiny text or basic geometric shapes or something.
I am not sure if I will make these into pins or not. I could also drill them now and see how that goes.
I made 21 in all today. Here is a scan of my first attempts. All the rubber stamps were Zettiology brand. Most of these are small portions of the rubber stamp, because these dominoes are so small and I don't own many stamps that are that tiny.
As of right now these do not have a sealer or a top coat finish on them of any kind. If I do seal them I will use Golden Acrylic Gel Medium in soft gloss. I would seal them to act as a protective layer against scratching.
This was a fast and easy project. The hardest part or longest part of the process was looking through my stamp collection and deciding which stamps and which tiny portions of the stamps that I would use on it, and deciding on which colors to use.
If you do this project I recommend that you sand a bunch of dominoes and have them ready. Then ink your backgrounds in a large batch, then use the heat gun on the large batch. Then apply the images, then heat set those. If you were to do one domino with all steps from start to finish, then start domino #2 the process would take forever!
I stamped my dominoes on scrap newspaper. I left them there to dry while I worked on the others. Then I heat set them right on the same paper, not even touching them as I didn't want to smudge the ink or burn my fingers on the hot dominoes. I then left them to cool right there in the same spot.
TIP: Make sure your fingers are clean. I messed up two by getting one color of ink from my fingers onto a new domino.
Other idea: Due to one ink pad being dirty with another color, two colors went onto the background of the domino. I chose to use both colors in the background. It ended up looking interesting.
TIP: If you smudge your rubber stamped image, immediately rub it off. It will leave a shadow image. Re-ink and re-stamp with the same color ink and same stamp or choose a new color and/or a new stamp. I tried this with one of them to cover up a mistake and it actually was an interesting result. Lesson: turn mistakes into something else, don't trash them.
NOTE: I have tried for two days to upload a photo to Blogger and their photo upload function is not working, still. I see it is on Blogger's list of known problems, and that they are working on it. I decided to share this entry now and I will have to post the photo at some later time. Sorry!
Friday, June 30, 2006
Saturday, June 24, 2006
Feeling Inspired by Sabrina Ward Harrison’s Work
Today we were in the car for a long time and I was a passenger. That meant I had time to read books with leisure and not feel any pressure that instead of reading I should be doing something else (which is what I feel lately when I am home and I try to read a book or even a magazine).
Today I chose to finish reading “Brave on the Rocks” by Sabrina Ward Harrison.
I was about 1/3 through the book when I picked it up today and I finished it. This is an artist’s journal in which the author/artist shares some very intimate thoughts (during the year that she was 23-24 years old). Part of the journal is based on a trip to Italy so it is also in part, a travel journal.
I can’t describe her style, it just must be seen. Go to her website at http://www.sabrinawardharrison.com/about/.
Here is an area of the site showing works from “Brave on the Rocks”.
You may also look through the Portfolio section of her site. Note that you can click on the icons for photography, on paper, on wood, and special projects.
I won’t do a full book review right now but I will share some things I am inspired to try based on what she did in “Brave on the Rocks”.
I am considering moving away from doing all my collage work on ATCs and instead to try to do more journaling ‘to keep’. I do love the sharing of the ATCs, though. I like making my ‘art’ then giving it away and swapping it for some other ATCs that I like and am inspired by. I feel selfish to just do journals that I will keep. I feel that I’ve already ‘spilled open’ enough in my life that I don’t need the journal to get myself free of penned up emotion. I feel like my heart is already being worn on my sleeve.
I will wrap up by saying that I have not read any of Sabrina Harrison Ward’s other books (but I am dying to). You can see a listing of her books on her site, here, and if you click on the book you can choose to see a bunch of scans of the pages from that book.
I had a hard time finding a copy of “Brave on the Rocks” and I wonder if it is out of print. I had to resort from buying a used copy from an Amazon Marketplace seller and paid near full retail for it (but that is okay because the condition is excellent so it is worth it). It normally kills me to buy a used book at a price which is near the full retail back when the book was new.
On the way home today I stopped at a Borders bookstore outlet store and wondered if I’d find any artist journal books like these there. I looked in the art section and found none. When I was back in the car I realized that this book is categorized by the publisher as a self help book (!). So apparently I was not looking in the right section of the store. I guess the next time I am in a used book store or a book discount store I am going to have to check those sections. I usually avoid them as I feel pretty well and not in need of ‘self-help’ at the moment!
Technorati Tags: Sabrina Ward Harrison, artist journal, journaling.
Today I chose to finish reading “Brave on the Rocks” by Sabrina Ward Harrison.
I was about 1/3 through the book when I picked it up today and I finished it. This is an artist’s journal in which the author/artist shares some very intimate thoughts (during the year that she was 23-24 years old). Part of the journal is based on a trip to Italy so it is also in part, a travel journal.
I can’t describe her style, it just must be seen. Go to her website at http://www.sabrinawardharrison.com/about/.
Here is an area of the site showing works from “Brave on the Rocks”.
You may also look through the Portfolio section of her site. Note that you can click on the icons for photography, on paper, on wood, and special projects.
I won’t do a full book review right now but I will share some things I am inspired to try based on what she did in “Brave on the Rocks”.
Write in water soluble crayon then put a little water on it and let the colors blend.
Add bits of dried plants to the pages with tape.
Tape photographs to the page, with messy shreds of masking tape (not hidden super clean scrapbooking type tape).
Repeat a favorite hand drawn object/item or a doodle that you like to do. Repeat it many times on a page. Make one large. Repeat the image throughout the journal in various sizes.
Take small torn off portions of maps or tickets and add them to the journal. You don’t have to use large pieces of things, just little snippets.
Use a sticker book and use the stickers randomly throughout a journal. It seems to me that she used a Dover sticker book of Victorian woman images. On one page there was a cutesy Bugs Bunny.
Combine elements and don’t worry about them matching, fancy writing font, stickers, maps, photos, etc.
Alternate between large images on a page with little writing with pages with lots of writing and small sized added elements (photos, etc.).
Use itemized bills and receipts on a page.
Make lists of what you see or hear or what you did that day or still need to do. Make wish lists of your dreams and short goal lists for your life.
Try keeping the words minimal but do use words that express the emotion you are feeling.
Try using a page with lots of color. Take an image that you are drawn to and make the centerpiece of the page. Leave it ‘empty’ like that or write on the background colored page. For example, one thing she did in the book was to use the clothing of paper dolls, floating on a page, when the writing on the page had nothing to do with that image.
Use fabric! Glue fabric to the page, fabric that you like or are drawn to.
So there are some things that I feel inspired to try.
I am considering moving away from doing all my collage work on ATCs and instead to try to do more journaling ‘to keep’. I do love the sharing of the ATCs, though. I like making my ‘art’ then giving it away and swapping it for some other ATCs that I like and am inspired by. I feel selfish to just do journals that I will keep. I feel that I’ve already ‘spilled open’ enough in my life that I don’t need the journal to get myself free of penned up emotion. I feel like my heart is already being worn on my sleeve.
I will wrap up by saying that I have not read any of Sabrina Harrison Ward’s other books (but I am dying to). You can see a listing of her books on her site, here, and if you click on the book you can choose to see a bunch of scans of the pages from that book.
I had a hard time finding a copy of “Brave on the Rocks” and I wonder if it is out of print. I had to resort from buying a used copy from an Amazon Marketplace seller and paid near full retail for it (but that is okay because the condition is excellent so it is worth it). It normally kills me to buy a used book at a price which is near the full retail back when the book was new.
On the way home today I stopped at a Borders bookstore outlet store and wondered if I’d find any artist journal books like these there. I looked in the art section and found none. When I was back in the car I realized that this book is categorized by the publisher as a self help book (!). So apparently I was not looking in the right section of the store. I guess the next time I am in a used book store or a book discount store I am going to have to check those sections. I usually avoid them as I feel pretty well and not in need of ‘self-help’ at the moment!
Technorati Tags: Sabrina Ward Harrison, artist journal, journaling.
Tuesday, June 20, 2006
ATC Art Box Arrived and Sent Out
I was thrilled to receive another Art Box on Saturday. The art box is part of an Internet based ATC trading group whose original focus was to swap out ATCs that other people made that we owned but didn’t necessarily want to keep (which the list owner calls “second generation” swapping. However the group also allows swapping of our own ATCs. In fact there are some members on the group whose art I love and which I am now collecting. I look forward to receiving the Art Boxes so I can see if some of my favorite trader’s art is in it!
The group originally only worked through private trades. It was kind of cumbersome as sometimes someone would want one of mine but I didn’t like what they had to offer, for example. Then the group morphed to do more private trading of our own ATCs because to increase our pool of tradable ATCs we’d add our own ATCs to our list of trade offers. Then the list owner had a great idea to send out these ‘art boxes’. At first there were 45 in each but now there are 90 (five sheets that hold 9 ATCs with one on each side, so 18 per sheet x 5 sheets = 90 ATCs).
So what happens is the art box is sent to us. When I received mine I already had a few ATCs that others made that I didn’t care to keep. I also had a bunch of my own ATCs that I had ready to swap out. We are allowed to put in 18 of our own ATCs. We can put in an unlimited number of other people’s ATCs.
To get another art box circulating some of us contributed nine ATCs to make a new box. I helped with that and gave nine of my own ATCs.
The box that arrived on Saturday had 24 ATCs that I kept. Actually I wanted 23 and my older son wanted 1. In that box were 3 of the ATCs which I had sent in to start the box off. So I put in 15 of my own ATCs in addition to my 3 that were already in there to hit the 18 max of my own ATCs that I could have in the box. I then went through all the ATCs that I own and picked out some others that I had not intended to swap out but did decide to let them go as the new ones which I had in hand were more desired for me to keep than the ones I let go. Sometimes it is fun to have an ATC for a while and to enjoy it but then I feel that it is alright to let it go back out into the world and to let someone else enjoy it. So I added in 9 second generation ATCs.
I savored looking at these ATCs over three different browsing sessions this weekend.
I was very efficient this time and instead of using up the two week timeline that we allowed to work with the Art Box was sent back out this morning. So I had it less than one business day.
The Art Boxes are sent by Priority Mail to keep things moving efficiently and with Delivery Confirmation, so we can track the status of each Art Box. Right now that costs $4.55 to do. Right now this trading list is only for residents of the United States so that we can use the Priority Mail and have a Delivery Confirmation and to keep the mail moving quickly. (More and more people seem to be having problems with International Mail, with ATCs sometimes arriving 6 weeks or even months after they are mailed out.)
I think this Art Box idea is brilliant and I wonder if it will be the wave of the future of ATC trading. I will say that it does take time and energy on the part of the organizer/list owner. There are also problems when the couple of times a person has kept a box and not returned it. I am not sure at this point if both of the boxes which went missing have been recovered or not.
It is wonderful to have 90 ATCs arrive in my mailbox. It is fun to look through all of them including who made them, see if I know any of them and also what country or state is the artists from? Seeing all those ATCs is also inspiring and I get new ideas. This is quite different from just viewing scans on the Internet. Seeing an ATC in real life is a superior experience.
Just had to share that I had fun with that trade! (Not all are the same; one Art Box was so not-my taste that I only kept 3 from it!)
So my collection of ATCs made by others has just grown by 23 ATCs!
Monday, June 19, 2006
My ATCs: Blue Block Collage
My ATCs: Blue Block Collage
A few days ago I shared the scan of the blue block collage before cutting it. I made that collage knowing it woudl be cut into ATCs but truly not deciding where to put things based on the fact that it would end up being four separate collages in the end. Therefore the focus of each ATC is not a perfect collage composition in some people'e eyes.
Below:
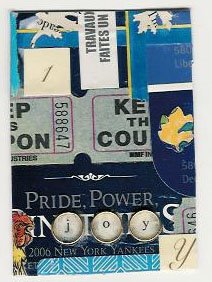
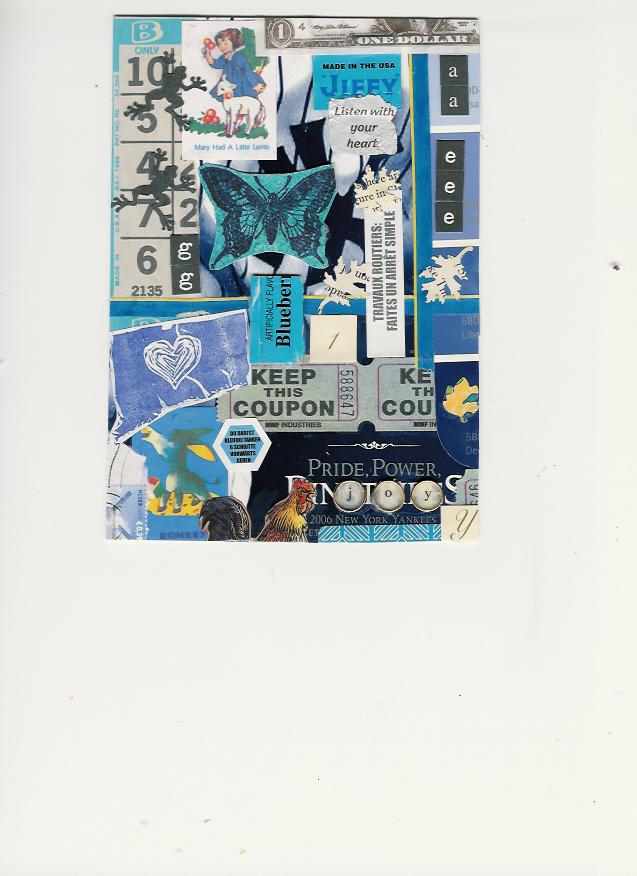
I should share that some of the pieces were chosen for whimsy or because I liked the look of them. Others were chosen very intentionally. I chose the letter "Y" in upper case because this was on a New York Yankees background. I chose the number "1" because of the sports ranking idea that the Yankees would love to be Number 1. My collages are combination of nonsense and whimsy and intention, as well as quick picks and intentional picks; which is which is something I will leave to you to decide.
A few days ago I shared the scan of the blue block collage before cutting it. I made that collage knowing it woudl be cut into ATCs but truly not deciding where to put things based on the fact that it would end up being four separate collages in the end. Therefore the focus of each ATC is not a perfect collage composition in some people'e eyes.
Below:
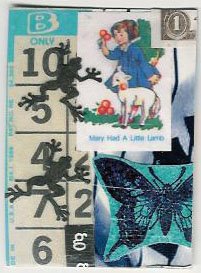
Here is the ATC in the upper left hand corner of the blue block collage, 1st ATC. This one has four elements which were given to me as hostess gifts by other ATC swappers: the Bingo card, the two frog die-cut's and the play money dollar bill. The butterfly is rubber stamped on a background that I had painted as part of other ATC playing I did months ago and the scrap was kept. The little 'Mary had a little lamb' is a very flimsy child's playing card game received as a birthday goody bag from a party that my children attended. It is too flimsy to really use as a game but it is perfect for use in collage!
 Here is the second ATC. This shows some of the background which is a New York Yankees promotional brochure we received in the mail. The Jiffy box (muffin mix), letters, play money dollar bill, and die cuts were RAK gifts from other ATC swappers. There is a little of the butterly. The foreign language text is left over from a children's game which came withe self-assembly parts in many foreign languages. The message "Listen with your heart" is from a Dove chocolate candy which I was given at a La Leche League workshop and just had to keep to use in a collage! Love the message!
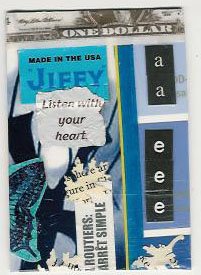
Here is the 3rd ATC from the left bottom corner of the block collage. This one is all RAK stuff, one more piece of foreign language from the child's game, and another flimsy playing card game piece with a donkey on it. There is a piece of a rooster which is from packaging that came with eggs. The Connecticut shaped rubber stamp was designed by me and is my first hand carved rubber stamp. This was from a test strip I was doing when still carving it and making the final touches on it.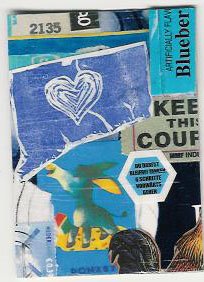
I should share that some of the pieces were chosen for whimsy or because I liked the look of them. Others were chosen very intentionally. I chose the letter "Y" in upper case because this was on a New York Yankees background. I chose the number "1" because of the sports ranking idea that the Yankees would love to be Number 1. My collages are combination of nonsense and whimsy and intention, as well as quick picks and intentional picks; which is which is something I will leave to you to decide.
So there you have it.
Feel free to share your comments. Do you like looking at these and trying to decode them? The only thing I was trying to do with this was have fun and use the color blue and complimentary yellow highlights. I tried to keep the other colors to white, black and grey.
Technorati Tags: artist trading cards, ATCs, mixed media collage.Thursday, June 15, 2006
Tonight I Made This Blue Block Collage
Tonight after dinner I sat down to make a block collage. This is 5 inches x 7 inches which means it will be cut into four ATCs.
What I did was gather a few small boxes of ephemera. A quick scan of what I had revealed many blue items popping out at me.
What caught my eye for a background was a promotional booklet that the New York Yankees sent us, trying to get us to buy tickets. My background was a large New York Yankees close up photo of a batter.
I then went through some packets of goodies that people sent me when I was hosting ATC swaps. I picked out various mostly blue things from these generous ATC swappers. The Jiffy box was even a RAK (random act of kindness) that someone mailed me, they put ephemera into a Jiffy blueberry muffin mix box and mailed that! The die-cuts were all mailed to me by other ATC swappers.
I added some things that were given to my children as a birthday party goodie bag (tiny card game pieces, long blue strips of paper).
There is one image that I had done in the past which is a rubber stamped butterfly stamp, I don't know the company who made that. I also have my first hand carved stamp image there, the shape of the state of Connecticut with a heart in it. That was left over from a test strip I did when I was doing the carving.
I finished the collage before even looking through all the papers I had on hand. These were all little scraps or little tourist brochures. I didn't use any pages of books and I spent no time going through magazines to find images.
This was a fun diversion.
So I quickly scanned it tonight, and am sharing it with you. I just cut it into four pieces and right now a top coat of sealer is drying. Tomorrow I will add my label to the back and seal that and let that dry.
Saturday, June 10, 2006
Serendipity: RubberStampMadness magazine
Two weeks ago I was in Michael's Craft Shop with a 40% off one item coupon in hand. I saw a brand new display of make your own rubber stamp kits. I bought one small kit (original price $11.50). I made one stamp that night (fun and easy). I made one stamp the next day (again fun and easy).
My in-laws gave me a 40% coupon yesterday and we were driving right by the store so in I went. Found out they discontinued the full line of that product, which seems very odd to me as it was a new line, but, whatever.
I then used the coupon to buy the latest issue of RubberStampMadness magazine. This is the second one I have ever purchased. Read it before bed last night (it makes light and fun reading as it has a humorous tone).
Today we were far away from home and to be gone all day. I read RSM while a passenger in the car.
Then my 'friend' visited me which was a total surprise. To make a long story short we ended up driving all over back roads then up and down I-95 jumping off exits to try and find a grocery store or Wal Mart or a drug store or someplace to buy the necessary supplies. (We were headed still an hour away to go on a long hike, then had over 2 hour drive home again.)
On one back road we saw a huge tag sale and I asked to stop and I'd ask directions. (In Connecticut you have a hard time finding anyone outside their house to stop and ask directions of.) Well while there I had to take a quick look and guess what, a whole table of used rubber stamps was there. I passed them up as they were too pricey when compared to new unmounted stamps and also to used stamps on eBay. However I did pick up on RSM from 1995 for 50 cents and 2 RSM issues from 2002 for 75 cents each. I also found a new in sealed container rubber mallet for crafting (perfect for using to make metal crafts a la "Metal Craft Discovery Workshop" book by the Opie's, for $2 (I have seen them as high as $15 in Home Depot and resisted getting it for that price).
Yippee!!
So then the more hours in the car were spent reading old issues of RSM.
I would like to share that in the past I didn't see this side of stamping and have a new appreciation for stamping. I also realized that the detailed landscapes and other original compositions that people make are more like collage but instead of cutting out images from some paper they press the images onto paper with the stamp. So really that kind of rubber stamping is very close to collage. I had read in one of the issues that someone was saying collage is the fad of the day and some snub their noses at rubber stamping, but that person actually did artwork that looked like collage to me. I think collecting images from different companies and putting them together in new ways to make a cohesive scene or even a whimsical larger image is an art form in and of itself. I don't think I'd be too good at that but I find regular collage easy.
Okay off to bed, just had to share that!
(I saw some new to me techniques I want to try on ATC sized canvases in the pages of RSM. I hope I have time to do some art making tomorrow!)
Friday, June 09, 2006
On a Roll with Making ATCs This Week
I felt long overdue with making time to make ATCs.
Wednesday: Spent 30 minutes making some on the kitchen table, before it was time for dinner to be made. Stopped and prepared dinner. While the chicken was baking in the oven spent another hour making ATCs, quick clean-up so we could eat on the table. I think I finished eight ATCs.
Thursday: Spent 30 minutes before dinner doing some sealing of other ATCs. Finished off some ATCs for a swap. Packaged up the swap to send to the swap hostess. Put together a little goodie bag for the hostess. Cleaned up the table so we could eat dinner on it.
After dinner the kids were busy playing an educational computer game together. I spent about two hours making ATCs. Made 18 of them including the sealing top coat and laid them to dry overnight. Cleaned up the mess and went to bed.
Went on the Internet and looked at what swaps for ATCs are going on right now, on two ATC chat lists. Found a bunch that I want to work on:
time theme
clock face theme
vintage clown
science fiction
wallpaper as background
garden
vintage women
my favorite kind of ATC
Friday: Again kids are playing on computer with the educational game, so I took the time to make more ATCs. Did four block collages using big wallpaper samples as the background, making collages with rubber stamped images, after adhering the wallpaper to old cereal boxes to make a sturdier base. Used rubbber stamps and old postage stamps to decorate the block collages. Used tinted acrylic glaze and acrylic paint to further embellish the ATCs. Set them out to dry. Off the top of my head, I think there will be 22 to come out of those four block collages.
My creative muse is with me today so I hope I can make more ATCs today. I want to use more of the rubber stamps that I own with the themes listed above. I also want to delve into my ephemera and do some very cluttered up collages.
Wednesday, June 07, 2006
My ATCs: Spanish Text Swap, Part Four
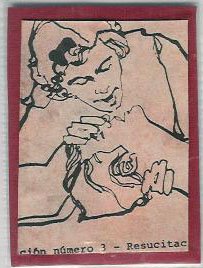
Here is another ATC I made for the Spanish text-only swap. The hostess sent me a page with instructions on giving CPR.
One of the challenges with the swap was that most of the images that the hostess sent me were large, too large to fit in their entirety on the ATC.
The other text she sent was text-only. I translated some of the text and there were pages of poetry. The poems I received were odd, one was about a wounded solider who was in love, suffice it to say I had a hard time coming up with illustrations to literally match the text. The other text she provided me with was a Spanish translation of The Odyssey. I was not in the mood to hunt down ancient Greek images and work with that.
Anyway, here is another I made ATC, of CPR. I used different colored (rubber stamp) ink on a stipple brush to add a pink color to this white page. I then cropped the image and mounted it on top of a handmade paper (made in India and purchased at A.C. Moore) in a coordinating color.

I hope the person who received it doesn't think it is too boring. I like it!
Technorati Tags: artist trading cards, ATCs, mixed media collage.
One of the challenges with the swap was that most of the images that the hostess sent me were large, too large to fit in their entirety on the ATC.
The other text she sent was text-only. I translated some of the text and there were pages of poetry. The poems I received were odd, one was about a wounded solider who was in love, suffice it to say I had a hard time coming up with illustrations to literally match the text. The other text she provided me with was a Spanish translation of The Odyssey. I was not in the mood to hunt down ancient Greek images and work with that.
Anyway, here is another I made ATC, of CPR. I used different colored (rubber stamp) ink on a stipple brush to add a pink color to this white page. I then cropped the image and mounted it on top of a handmade paper (made in India and purchased at A.C. Moore) in a coordinating color.
I hope the person who received it doesn't think it is too boring. I like it!
Technorati Tags: artist trading cards, ATCs, mixed media collage.
Sunday, June 04, 2006
My ATCs: Spanish Text Swap, Part Three
Here are more Spanish text ATCs that I created in May 2006 for a Spanish text only ATC swap.
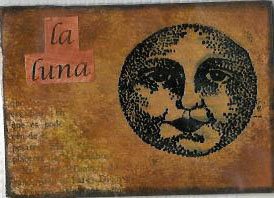
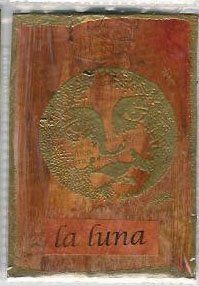
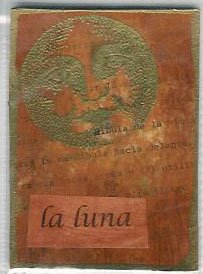
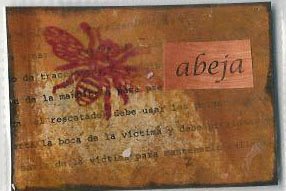
These are all mixed media collages. All started out with Spanish text as the background paper, with acrylic paint, acrylic wash and acrylic glazes on top (muliple layers of several different colors). I then applied rubber stamped images on top. Some I re-did with the rubber stamps and embossing paper. Some have edges in ink and others have embossed edges. All are sealed on both sides with Golden Acrylic Soft Gel Medium in gloss.
These three feature the moon.
These three feature a bee.
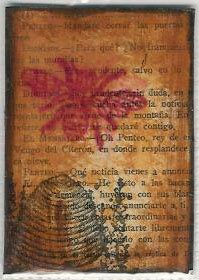
 In real life the Spanish text is visable underneath this paint (of the ATC above).
Technorati Tags: artist trading cards, ATCs, mixed media collage.
These are all mixed media collages. All started out with Spanish text as the background paper, with acrylic paint, acrylic wash and acrylic glazes on top (muliple layers of several different colors). I then applied rubber stamped images on top. Some I re-did with the rubber stamps and embossing paper. Some have edges in ink and others have embossed edges. All are sealed on both sides with Golden Acrylic Soft Gel Medium in gloss.
These three feature the moon.

These three feature a bee.
 In real life the Spanish text is visable underneath this paint (of the ATC above).
Technorati Tags: artist trading cards, ATCs, mixed media collage.
Saturday, June 03, 2006
My ATCs: Spanish Text Swap, Part Two
Here are two more Spanish text ATCs that I made for a Spanish-only text ATC Swap that I participated in, in May 2006. These are mixed media collages.
I had blogged about these ATCs in the past when I had creative block with them. Here are the finished pieces!
I had blogged about these ATCs in the past when I had creative block with them. Here are the finished pieces!

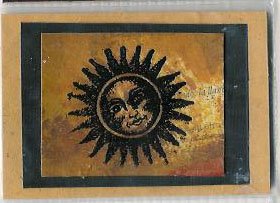
The background started off with Spanish text pages which the hostess had ripped from a book. I used acrylic craft paint (nothing fancy) which I watered down with water to make a wash to paint over it (which is called an acrylic wash). I also used some custom tinted acrylic glazes. I used a stipple brush to apply the paint. There are several different metallic colors of paint used here. I then rubber stamped the image onto the ATC. I don't know the brand of this rubber stamp as I bought it used in a 'lot' on eBay (from a woman who was really into crafting who died suddenly!). I didn't like the way the stamp came out so I re-did it using embossing powder.
On the first one, I then added the phrase 'el sol' by printing it off on my computer then painting that and adhering it to the ATC. Now that I look at it I realized I probably should have used a different color on the 'el sol' piece, oh well.
The second one, I botched by blobbing paint on that looked horrible. To save it I cropped out the mistake part and made it smaller. I then adhered it to a background of black handmade paper from India. I then adhered that to another background paper. I think it came out well. I really want to stress that I'd never have done this type of shape ATC as I usually just don't do that (no specific reason) but I did this to save it from being ruined. I think it came out nice.
These are sealed with Golden Acrylic Gel Medium, soft, in gloss.
I continue to have problems uploading scans to Blogger so for today I give up and am sick of wasting my time, so I can only share these two with you today!
Technorati Tags: artist trading cards, ATCs, mixed media collage.
Thursday, June 01, 2006
My ATCs: Spanish Text Swap, Part One
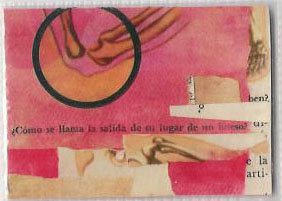
I participated in an ATC swap called "Spanish Swap" in May 2006. The hostess mailed us twelve pages with Spanish text on them. We had to create ten ATCs using these pages.
Right now I will share three of the ATCs that I made with the Spanish text pages that the hostess sent me. I hope to share more when the Blogger photo uploading function is working properly (right now I am getting error messages).
These are mixed media collages. These first three were made by using background paper of watercolor paper which I painted with watercolor paint. I then made a packing tape transfer of the image and some Spanish writing and affixed it to the ATC.
The first two are just the packing tape transfer on top of the watercolor painted paper.
Technorati Tags: artist trading cards, ATCs, mixed media collage.
Right now I will share three of the ATCs that I made with the Spanish text pages that the hostess sent me. I hope to share more when the Blogger photo uploading function is working properly (right now I am getting error messages).
These are mixed media collages. These first three were made by using background paper of watercolor paper which I painted with watercolor paint. I then made a packing tape transfer of the image and some Spanish writing and affixed it to the ATC.
The first two are just the packing tape transfer on top of the watercolor painted paper.

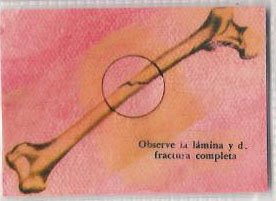
For the third I added extra pieces of paper from the book page in Spanish which was a medical book about bones, disorders of bones and fractures of bones. As you can see the use of the packing tape transfer piece (from the same book) looks so different than when using the actual text and images from the same book.
Technorati Tags: artist trading cards, ATCs, mixed media collage.
Subscribe to:
Posts (Atom)

