I signed up for an ATC swap using vintage found photos. The hostess was generous and said if any of us don’t have our own vintage photos she’d send us some if we’d send her a self-addressed, stamped envelope. I received more photos than the swap requires, so I get to keep some. The photos must be black and white and the actual photo must be used on the ATC.
I made one ATC three nights ago. I made one ATC two nights ago. I started the last three last night (but they are not finished yet). Each of my ATCs looks very different than the others.
What I am craving is a large block of time to just play and make ATCs. Real life has not allowed that lately, though, so I am squeezing in a little here and there in between whatever else I am doing around here.
I love antique photos. I try to figure out what the story is behind the photo, based on everything I see in the photo from the background to the expressions in the people’s eyes. What I am doing is linking in what I interpret is going on as the theme of the ATC.
When they are finished, and if Blogger’s photo uploading tool is working, I will share these with you.
Wednesday, November 30, 2005
Finished Progressive ATC Swap
I participated in a progressive swap which is finishing up right now. Some people call these a jam or a round robin. The way this one worked was that person #1 began a card with a background color and one thing added to the surface. Then the ATC went to person #2, #3, and #4. The last person is to return the original to person #1. Person #1 then makes a copy of it and sends to people #2, #3, #4.
Me as person #1
I just received the card that I started. It came out great. I started with a background of watercolor paper and stripes of pink and yellow colors. I added a postage stamp from England showing a queen. For that ATC people put all related themes on the card.
Me pas person #2
Also this week I received the ATC that I was person #2 for. That card had autumn colors in polished stone technique (alcohol inks) to begin with, and the word "fall". I therefore was forced to add in elements that were related to autumn. I had a great butterfly image that I considered adding as a packing tape transfer because it had colors in that color palette and would aesthetically look great. However I didn't do it as I felt butterflies were more of a summer thing than a fall thing so I didn't put it on the ATC. What I added was a cut out of a portion of a hand drawn pumpkin (in the old-fashioned style) from a seed catalog (Shumway's) and the beautifully written name of the pumpkin. I also added a transparent sticker of an apple. What I found interesting is that person #3 or #4 added a butterfly! We had the same idea!
Me as person #3
One lovely card had a dark blue background with a round image on it which to me (and my son) looked like a full moon. It also had a black border around the entire ATC. I had a hard time figuring out what to do with it. I ended up finding a quote about the moon and writing those words inside of the moon in a spiral pattern. I would have done something to the background but didn't have pens that were colors or types that could write on top of dark blue and actually show up. Also at that time all of my rubber stamp inks would not have shown up on that color so I couldn't add a rubber stamped element.
Me as person #4
As person #4 I received an ATC and was really stumped. I had a hard time figuring out what to do with it. For one thing there were fibers added to the ATC which were attached in the top corner and just hanging down. They were very busy and in my opinion, a mess. They blocked some of the leaf image. I thought about adding one more element to the card but came up empty handed. I couldn't figure out how the elements on the ATC were connected. It was a collage. However I felt it was very disjointed. There was a die cut out shape of a leaf. There was a different shaped leaf, bright green sticker. One half of the background was beige and the other half was mauve. There was a green postage stamp from England showing a Prince. There were primarily cranberry colored fibers, with smaller elements of pink and orange. One edge of the ATC had a sewing pattern on it and the words "cutting line".
I decided to braid the fibers to make it more of a controlled very thick hanging down fiber. It is still hanging free. I considered gluing I then top coated the ATC with three different glazes ranging from cream colored to sweetheart pink to light orange. Now the background is more unified. Those colors matched and coordinated with the fiber colors. I wanted to add some text, words, a poem or a quote. I spent over an hour searching for something to tie a prince and leaves together but came up empty handed so I gave up on the idea. I couldn't figure out a single word or even a short phrase that would make sense for both a prince and leaves or also sewing and the color pink. I am going to send this off to person #1 today as I guess it is finished.
I found participating in this type of activity much more difficult than working with my own ideas from start to finish.
I also don't like just slapping something on there to 'get it done'. So when I have trouble figuring out what to add it is not fun for me. I want to work to find something that is "right" and is connected rather than just putting something on there to 'be done with it'.
I didn't really like participating in this type of swap. It is hard to take someone else's work and figure out what to add to it. I don't think I will do these in the future.
Monday, November 28, 2005
Carol Duvall Show Techniques Free Online
I discovered that every Carol Duvall show has an archive on the internet. Each show’s segment is written up in word form accompanied by step by step color photographs.
These are useful if you are curious about a technique but didn’t even know that it aired on her show. Obviously they are also handy if you watched her show and now want to print off directions to use now.
I used to dislike the Carol Duvall show. However now I TiVo it and am enjoying some of the segments. The great thing about TiVo is if the art or craft is something I am disinterested in, I hit the fast forward button and/or the delete button.
On some shows Carol shows and in-depth interview with a professional artist. We see interviews with the artist, see how they do their (complicated) and beautiful work. We often see them at work in their studios. At the end we hear how we can buy it and what it costs. I love it when the prices range from $50 to $5K—only in America!
Also I think it is interesting and funny that my kids love to watch this show with me. They also have begun watching it alone (!!) during the time when they’d normally watch a “kid show”. They are both inspired to try different things.
This weekend they are asking me to make them sock monkeys and sock animals. Sock reindeer making was featured on one show.
I loved a different segment about using rubber stamps to put acrylic metal paint on the windows for holiday decorations. The demo was called “Snowflake Window”. Here are the directions and a photo.
They showed snowflake shapes being put on house windows. All they did was mix ‘acrylic metal paint’ with optional sparkle acrylic craft paint and optional blue acrylic craft paint and stamp it on. When you want to remove it you soak a wet paper towel on it and it lifts off.
I looked at A.C. Moore for “acrylic metal paint” yesterday, and couldn’t find any. They had said this was an acrylic paint which normally gets used on metal surfaces. I found regular acrylic paint with metallic colors (which I don’t think is the same thing). Hmmm.
Here is a show archive about using unmounted rubber stamps. I wish I'd known to look there instead of searching for quite some time using an internet search engine a few weeks ago.
Enjoy!
Saturday, November 26, 2005
New Blogger Fuction: Search This Blog
Yippee!!
Blogger has added a function that allows readers to search for keywords inside of a blog. This is not restricted to the blog entries that are showing on the screen. The search goes back through the entire blog's archives.
Again, Yippee!!
I had tried installing Google's Search Engine that allows for the search inside the blog but with the Blogger templates, the Google function doesn't work.
I am glad that I now can search inside my own blog, and of course I am glad you can search inside of my blog!
You can find this function at the very top of each Blogger blog page.
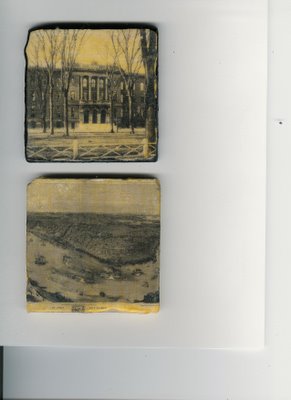
Making Marble Art Tiles
My First Attempt
Yesterday I blogged about looking at the “Above the Mark” rubber stamp company website for the first time. On the site I loved the marble art tiles featured on the “how to” page. The writer stated that she purchased a set of four marble art tiles for $50 in a gift shop and she set out to recreate them at home. The site has the full directions for this project.
My original plans for yesterday were to relax and make ATCs. But once I saw the marble art tiles and realized they were inexpensive to make, I set out shopping. I went to a local art shop (a 30 minute drive away) to buy mat medium. I then went to Home Depot to buy marble tiles (box of nine for $5.98). Last evening I began making my first marble art tiles.
This morning I was looking at the finished product and felt that the edges were too rough. Some of the transfer had gone down over the sides in an uneven way. My fingerprints were on some of the edges also, which meant that the sides were yellow ochre color except for where I had accidentally touched it, and those areas were white.
So I tried an experiment. I decided to paint the edges of one of the tiles with black acrylic paint. I also painted a very thin border around the top surface. I let it air dry then placed two top coats of mat medium (allowing to air dry in between).
I am very happy with the result. This is a very easy project.
The background on the images is this:
The marble tiles that I selected were white and not very pitted. Home Depot had others which were a more tan or beige color but those were sometimes deeply pitted and I worried that this would not accept a transfer well.
For the first two marble tiles I used yellow ochre acrylic paint to tint the mat medium for the undercoat. I assume that one could also tint the top coat of the mat medium, but I kept the top coats clear.
I had some wool felt on hand and cut a square and used tacky glue to apply it to the underside of the art tile. This will keep the tile from scratching the surface that it lies on. I assume these will be used as coasters. The website suggested using a sheet of cork or adhesive backed foam. I opted for what I had on hand.
Tried Ceramic Tiles Also
I also wondered if this technique could be used on tumbled/unfinished ceramic tile. I don’t know the proper terminology to describe this so bear with me. I found a set of small tiles which are linked together by some adhesive in a grid pattern. It is about a foot square in total size, with 36 small square tiles altogether. This grid was $2.59 (what a bargain). I cut the adhesive strip and tried the technique on one tile. For that I used a very small clip art type of image which appeared in a local newspaper advertisement. That worked fine as well. It does seem that the area where the newspaper was left a grey impression. I had cut the newspaper in a square shape and the black image was irregularly shaped (it was a steam locomotive). I guess if I wanted it cleaner looking I could cut along the edges of the image (as in decoupaging). I was curious overall if the technique would work on rough ceramic tile and also if it would work with newsprint. The answer is yes to both questions.
Oh and I figured these tiles would make great refrigerator magnets if I can find magnets strong enough to hold their weight.
I have not yet experimented with using rubber stamps on top of the transferred image but that will definately be experimented with!!
The next project
This morning I woke up before everyone else. I spent some time looking for images to use to make more marble art tiles. The trick is to find images to match the personalities or interests of the people that I want to give these gifts to. I looked through antique books which I own, which are so old that they are in the public domain. I looked at some antique greeting cards that belonged to my great-grandparents and to my grandmother (which are so old they are not copyrighted!). I also looked on Google Images to see what I could find there.
I am having a hard time coming up with ideas of what type of images my husband’s aunt and uncle would like. I was thinking of making coasters for a holiday, such as Christmas. However his aunt is Jewish (and his uncle is Catholic). I thought about antique images but wasn’t sure if they liked Victorian children or what. I will have to think about this a bit more.
Reversing Images
I also taught myself how to reverse an image in PhotoShop (a program I won as a contest prize but have never taken the time to teach myself to use). This took some creative thinking as my search on "reverse image" failed. I had to think of a more dumbed down phrase, and I figured it out. They use the term "flip". If I want to transfer writing/letters I must first reverse the image so that when the transfer is done the words are legible (rather than mirror-images). I am glad I can do this right here at home (in books and magazines they usually refer the reader to go to a copy shop to pay for a copy to be made and to ask the staff to 'reverse' the image).
Finding Images
The hardest part of this project is finding images I like enough to use then to scan them and downsize them to the right size. Sometimes a great image doesn't look as good when cropped to a 4x4 inch size, because key elements of the image are cut off, because the orignal was a rectangle shape.
I also had an idea that instead of making a clean cut square image that touches all the top edges, I could tear the edges of the paper for a tattered look and make the image just smaller than the 4x4 inch square.
Yesterday I blogged about looking at the “Above the Mark” rubber stamp company website for the first time. On the site I loved the marble art tiles featured on the “how to” page. The writer stated that she purchased a set of four marble art tiles for $50 in a gift shop and she set out to recreate them at home. The site has the full directions for this project.
My original plans for yesterday were to relax and make ATCs. But once I saw the marble art tiles and realized they were inexpensive to make, I set out shopping. I went to a local art shop (a 30 minute drive away) to buy mat medium. I then went to Home Depot to buy marble tiles (box of nine for $5.98). Last evening I began making my first marble art tiles.
This morning I was looking at the finished product and felt that the edges were too rough. Some of the transfer had gone down over the sides in an uneven way. My fingerprints were on some of the edges also, which meant that the sides were yellow ochre color except for where I had accidentally touched it, and those areas were white.
So I tried an experiment. I decided to paint the edges of one of the tiles with black acrylic paint. I also painted a very thin border around the top surface. I let it air dry then placed two top coats of mat medium (allowing to air dry in between).
I am very happy with the result. This is a very easy project.
The background on the images is this:
1. I wanted to give one to my father-in-law. I tried thinking about what type of image he’d like. I decided to use Google Images to find a photo of his high school, the way it looked when he attended the school in the 1930s. I did find a copyright free vintage photo quickly. I downloaded this to my computer then printed it off on my laser printer. The resolution was not fantastic but this was an experimental piece anyway.
2. I wanted an image of a map of New Orleans. I went to Google Images and found an interesting aerial type view which is more of a painting than a map. It was from 1850 and from what I could gather, is copyright free. The resolution on this is quite poor, when printed out, which was disappointing.
The marble tiles that I selected were white and not very pitted. Home Depot had others which were a more tan or beige color but those were sometimes deeply pitted and I worried that this would not accept a transfer well.
For the first two marble tiles I used yellow ochre acrylic paint to tint the mat medium for the undercoat. I assume that one could also tint the top coat of the mat medium, but I kept the top coats clear.
I had some wool felt on hand and cut a square and used tacky glue to apply it to the underside of the art tile. This will keep the tile from scratching the surface that it lies on. I assume these will be used as coasters. The website suggested using a sheet of cork or adhesive backed foam. I opted for what I had on hand.
Tried Ceramic Tiles Also
I also wondered if this technique could be used on tumbled/unfinished ceramic tile. I don’t know the proper terminology to describe this so bear with me. I found a set of small tiles which are linked together by some adhesive in a grid pattern. It is about a foot square in total size, with 36 small square tiles altogether. This grid was $2.59 (what a bargain). I cut the adhesive strip and tried the technique on one tile. For that I used a very small clip art type of image which appeared in a local newspaper advertisement. That worked fine as well. It does seem that the area where the newspaper was left a grey impression. I had cut the newspaper in a square shape and the black image was irregularly shaped (it was a steam locomotive). I guess if I wanted it cleaner looking I could cut along the edges of the image (as in decoupaging). I was curious overall if the technique would work on rough ceramic tile and also if it would work with newsprint. The answer is yes to both questions.
Oh and I figured these tiles would make great refrigerator magnets if I can find magnets strong enough to hold their weight.
I have not yet experimented with using rubber stamps on top of the transferred image but that will definately be experimented with!!
The next project
This morning I woke up before everyone else. I spent some time looking for images to use to make more marble art tiles. The trick is to find images to match the personalities or interests of the people that I want to give these gifts to. I looked through antique books which I own, which are so old that they are in the public domain. I looked at some antique greeting cards that belonged to my great-grandparents and to my grandmother (which are so old they are not copyrighted!). I also looked on Google Images to see what I could find there.
I am having a hard time coming up with ideas of what type of images my husband’s aunt and uncle would like. I was thinking of making coasters for a holiday, such as Christmas. However his aunt is Jewish (and his uncle is Catholic). I thought about antique images but wasn’t sure if they liked Victorian children or what. I will have to think about this a bit more.
Reversing Images
I also taught myself how to reverse an image in PhotoShop (a program I won as a contest prize but have never taken the time to teach myself to use). This took some creative thinking as my search on "reverse image" failed. I had to think of a more dumbed down phrase, and I figured it out. They use the term "flip". If I want to transfer writing/letters I must first reverse the image so that when the transfer is done the words are legible (rather than mirror-images). I am glad I can do this right here at home (in books and magazines they usually refer the reader to go to a copy shop to pay for a copy to be made and to ask the staff to 'reverse' the image).
Finding Images
The hardest part of this project is finding images I like enough to use then to scan them and downsize them to the right size. Sometimes a great image doesn't look as good when cropped to a 4x4 inch size, because key elements of the image are cut off, because the orignal was a rectangle shape.
I also had an idea that instead of making a clean cut square image that touches all the top edges, I could tear the edges of the paper for a tattered look and make the image just smaller than the 4x4 inch square.

Friday, November 25, 2005
Bought Great Rubber Stamps on eBay
After seeing the high prices of new rubber stamps in local craft stores I decided to check out eBay.
I casually looked online and happened to see a slew of rubber stamp “lots” with auctions ending that evening. As I read the auction’s information I was surprised to learn that the rubber stamps being sold were part of an estate. A woman had died suddenly, leaving thousands of rubber stamps. A relative and a friend were working together to sell the rubber stamps in lots (large groupings) and the money was going to the estate. (What a story!)
Since the sellers didn’t know details such as the brand of stamps, I have a feeling that these went for quite a bargain price.
I saw designs exactly like I was looking for, eclectic and interesting images which could be used in collage, for ATCs and in altered books. I bid on a few auctions and won two. I was thrilled.
One thing that had me worried was that the stamps were listed as unmounted. There was not a photo of the actual stamp, just of the imprinted image. I did some research on the internet and through an ATC chat list inquiring what was involved in using unmounted stamps. I learned that I’d have to buy a cushion material and special adhesive glues, and cut out the rubber stamp image first, glue it to the cushion, then later cut the cushion. Whew, that sounded like a lot of work. I also was told I could mount the rubber to a piece of wood or to a clear acrylic block with double stick tape to use it, then remove the solid backing when finished. It was recommended to save storage space, that they are stored unmounted.
I was pleasantly surprised and happy to see, when the stamps arrived in the mail, that the former owner had already mounted the stamps onto cushion. This meant that there was less work for me to do. Additionally they were actually worth more in value since the lucky buyer would not have to buy the cushion material or the adhesives. Therefore to me, these stamps (which are in “like new” condition) are actually worth more than the new full retail price. (I’d rather spend my time making stuff than preparing unmounted stamps for use.)
Immediately after those auctions ended (all within minutes of each other), more auctions were listed. Over that next week I really scrutinized the “lots” and decided which I really loved, in an attempt to limit myself. I immediately recognized some stamps were from Zettiology,(and I loved them and wanted them) so I could compare the new retail price to the price of the eBay auction.
I really thought about how much I’d want to spend on each lot and decided which lots to not bid on. This was a very hard decision to make. I figure I will take Christmas money that my relatives will give me to buy gifts for myself and allocate that to buying these stamps. If my husband were employed I’d have bid on more auctions than I did, and I’d have bid higher prices to try to ensure that I’d win. I’d also probably be splurging on buying rubber stamp catalogs and buying brand new stamps from said catalogs.
I also corresponded with the seller before the auctions closed, and learned that this was their last round of auctions for rubber stamps. Apparently they had been selling lots of these rubber stamps for months. They would list a bunch on one evening and then when those auctions closed, they’d list another batch of auctions.
I will confess to not advertising to my fellow ATC’ers on the chat list or even here on my blog, that these great rubber stamp auctions were taking place as I didn’t want competition for them. I figured if anyone wants to buy rubber stamps on eBay they’d already be browsing the eBay auctions!
(I also was told that there were two rooms of scrapbooking materials that they are getting ready to begin listing! Holy Moly. I don’t do scrapbooking but many of the same supplies and papers can also be used for collage and ATCs and altered books. There is a chance that these auctions may go for low selling prices if the sellers don’t do detailed enough descriptions of the materials because they don’t know much about the scrapbooking industry, company names, proper terms, etc.)
Today I was looking at a website for the company “Above the Mark” and the stamps that I purchased were very similar to these unmounted rubber stamps. I wonder if my stamps were made by this company? (The stamps don’t indicate what company made them.)
By the way, "Above the Mark" is a great website with a wonderful explanation of doing transfers, with instructions and color photos of the process.
Also there is an explanation of how to do transfers on top of painted surfaces.
The site also has a projects page with directions on how to make lovely projects. I am going to try the “art marble tiles” . If I can get it to work, I will give some to people for Christmas gifts.
The site also has some free vintage images that you can download and print off to use as you wish.
Tuesday, November 22, 2005
Tried Contact Paper Transfer and It Failed
Yesterday I went to put some things away into the craft closet and saw my contact paper. I took advantage of a few minutes of free time to try three contact paper transfers with scraps of paper. I used clear contact paper that I have had in the closet for perhaps 3 years. I was following directions in a book. The directions were simple. Put the contact paper on an image to transfer. Rub. Soak. Rub paper off.
It failed miserably. The images were barely visible.
I also noticed the contact paper was not very sticky at all, which I found odd.
Oh well!
It failed miserably. The images were barely visible.
I also noticed the contact paper was not very sticky at all, which I found odd.
Oh well!
Sunday, November 20, 2005
Some Awesome ACEOs by Lambert on eBay
ACEO is the name for a 2.5x3.5 inch piece of artwork which was created with the intent to be sold. So ACEOs are similar to artist trading cards but ACEOs were made and intended to sell for profit.
There are some gorgeous pieces of art selling on eBay, which are ACEOs. One of my favorite artists is LAMBERT. This artist does watercolors. Do a search on eBay for "LAMBERT ACEO watercolor" and you will see some winterscapes come up. My favorites are the ones which are just trees and snow.
Some of them sell for up to $25 each. Lately from what I have seen, most of this artist's ACEOs sell for about $10.
I don't own any of these. If I had the money, I'd buy some of my favorites and frame them and hang them in my home as artwork.
As a matter of fact you can find over 2500 ACEOs on eBay if you search for all ACEOs rather than look for specific mediums (i.e. watercolors).
What is not ethical is getting an ATC from someone free in a trade then selling it. These ACEOs are created by the artist with the intent to sell, which is fine and well for them to do.
Friday, November 18, 2005
Gesso
I have been reading about Gesso on the net and in books and magazines, when artists explain how they made certain pieces of art, collage, altered books, artists journals and artist trading cards.
I have not been able to find gesso in local art and craft shops.
I decided to buy it online at a discount from MisterArt.com. I have never purchased from them before.
I had a hard time deciding what to buy. I am on a tight budget so I decided to buy 8 oz. of white gesso (Golden brand) and 8 oz. black gesso (Golden brand) and some Golden Acrylic Gel Medium and then I spent a few bucks on a small container of metallic gold mica dust.
The order arrived yesterday but I didn't have time to do any art or even to check the products out.
Today I was surprised to see that gesso is smooth and seems just like acrylic paint. I am a bit unsure how artists end up making texture or roughing up the surface with such a thin, runny liquid. So I went online to learn a little more about gesso. Here is a great article which is educational.
I learned a few things from that article that I had not learned elsewhere.
Today I put a coating of white gesso on a cardboard, empty, hot chocolate powder-mix container. I plan to collage on this surface. I also painted the back cover of my first/experimental altered book.
I plan to make time today or tonight to work on ATCs and to experiment with altered books. Now that I have the acrylic gel medium I may start working on a new altered book, using the gel medium to make blocks of pages to work upon. Perhaps tomorrow, after that is dry, I can begin coating the pages of the AB with gesso to prime them for collaging onto.
For the record it has been at least seven days since I've worked on ATCs in a serious way. I have only spent about ten minutes total in this last week working on ATCs. What I have been doing is mostly cleaning and decluttering the house, (so now all my art supplies are put away), and I've been homeschooling the kids and doing extra Cub Scouts projects and meetings. I really feel the need to spend time making art today!!
I have not been able to find gesso in local art and craft shops.
I decided to buy it online at a discount from MisterArt.com. I have never purchased from them before.
I had a hard time deciding what to buy. I am on a tight budget so I decided to buy 8 oz. of white gesso (Golden brand) and 8 oz. black gesso (Golden brand) and some Golden Acrylic Gel Medium and then I spent a few bucks on a small container of metallic gold mica dust.
The order arrived yesterday but I didn't have time to do any art or even to check the products out.
Today I was surprised to see that gesso is smooth and seems just like acrylic paint. I am a bit unsure how artists end up making texture or roughing up the surface with such a thin, runny liquid. So I went online to learn a little more about gesso. Here is a great article which is educational.
Gesso: What It Is and How To Use It by aisling d'art
I learned a few things from that article that I had not learned elsewhere.
Today I put a coating of white gesso on a cardboard, empty, hot chocolate powder-mix container. I plan to collage on this surface. I also painted the back cover of my first/experimental altered book.
I plan to make time today or tonight to work on ATCs and to experiment with altered books. Now that I have the acrylic gel medium I may start working on a new altered book, using the gel medium to make blocks of pages to work upon. Perhaps tomorrow, after that is dry, I can begin coating the pages of the AB with gesso to prime them for collaging onto.
For the record it has been at least seven days since I've worked on ATCs in a serious way. I have only spent about ten minutes total in this last week working on ATCs. What I have been doing is mostly cleaning and decluttering the house, (so now all my art supplies are put away), and I've been homeschooling the kids and doing extra Cub Scouts projects and meetings. I really feel the need to spend time making art today!!
Running Out of Packing Tape
Yesterday I was packing a box of books to mail out, which is part of a volunteer job that I do. My eight year-old son noticed the tape was about to run out. He said, "Oh no, we can't run out! We need it to do packing tape transfers!".
A boy after my own heart.
A boy after my own heart.
Thursday, November 17, 2005
More Citrasolv Transfer Experiments
Two days ago, I was reading the local newspaper and saw some images I thought would be great for using for transfers with ATCs. I decided to see if Citrasolv transfers would work on newsprint. These papers were one week old. I have read that the newer the printing, from a copier or a computer printer, the better. I assume this is the same for newspapers but I don’t know (yet).
I was transferring onto card stock paper. I plan to use these as base papers/backgrounds for ATCs.
Here is what I discovered:
The darker the paper you are transferring on to, the worse the image will come through. It seems like the ink gets sucked into the paper more or something. Transferring to a medium blue paper was a complete failure. I tried transferring to kelly green and it was alright, but a second transfer with the same image to white card stock was bright and darker, which I found odd, because with lighter papers the first image is dark and the second use of the same image is lighter.
I found that color photographs from the newspaper came through very poorly.
Black and white photos didn’t transfer well either.
Illustrations or writing with grey tones didn’t work well.
The best transfers were black and white, such as are common with clip art images. I found lots of great images in local businesses ads. Simple illustrations with clean lines came through wonderfully. Many of the small ads had small images which are sized well for using on ATCs.
I used the back of a spoon and the side of the spoon to rub with.
If I put even pressure on the entire image then it came through looking solid.
If I used the side of the spoon and wasn’t thorough then the transfer came through with scratch like images which actually was interesting and could be made to be the goal if I wanted it to be.
I was able to get one strong transfer and one weaker, more ephemeral transfer. The third transfers were very weak.
I really rubbed on one, where there was no printing, and what came through was the ink from the opposite side of the paper. It looked interesting. I had an image of a ballerina (ad for Nutcracker ballet) and then around the head and shoulders were light transfers of words.
I transferred some bold graphic checkers from an ad’s border and they came out great.
Writing gets reversed, but can make for an interesting intentional addition to a collage.
Here is the method in case you don’t know.
Cut out an image that you want to transfer.
Get your paper ready.
Put the transfer image face down on the paper where you want it to be.
Take a small piece of paper towel and saturate it with Citrasolv concentrate.
Hold down the papers so they don’t move, with fingers from one hand.
Rub the Citrasolv over the back of the image so it soaks through the paper.
Rub over the back of the image with something hard such as a spoon or a bone folder
Peek under the corner to see how is it coming through.
Stop rubbing when it looks good to you.
Remove original paper.
Put the transferred image to air dry.
You can get more than one transfer out of the original image if you want.
Make sure to wash your hands when you are done and to NOT get it in your eyes.
I see that sometimes the Citrasolv leaves a ‘stain’ on the paper from the orange oil. To avoid a splotched effect you may want to make sure the entire paper gets whetted with it so that it looks uniform.
Citrasolv is a degreaser and therefore robs your hands of oil. Use hand lotion if your hands become dry, or wear gloves while using it.
Of course take heed of all of the product warnings that are on the product label. Citrasolv is a 100% natural product which is made from the oil from orange peels. It is a strong solvent which has a great orange scent and is 100% natural. When the paper dries, it retains the natural orange smell, which I love!
Then I taught my kids how to do the transfers and they made some with my supervision, taking care to not rub their eyes when the Citrasolv was on their fingers. I had them wash their hands as soon as they finished with it.
Then my kids asked if they could try a packing tape transfer and I let them do some of those. They both decided they liked those better as the images looked ‘accurate’ and ‘real’.
I personally like the hazy, dreamlike quality of the Citrasolv transfers.

Top left, experimentation with writing. Letters come out reversed. I chose different fonts, pretty fonts and overlapped them.
Believe it or not the tree on green paper was first and the white was the second transfer.
Checkerboard border, testing to see how very plain and bold patterns look.
Ballerina on red was first transfer and the yellow paper was the second transfer. I am not sure if you can see the faint text that came out around her head, that came through from the other side of the newspaper.
I liked the image of the postal carrier.
The one on brown paper was from an ad for an optical shoppe. It is a bench in front of a small store front with window, shutters and the door. On the window pane was the name of the business. I cut that out as when I did the transfer it would have appeared in reverse.
This was quick and fun to do.
I was transferring onto card stock paper. I plan to use these as base papers/backgrounds for ATCs.
Here is what I discovered:
The darker the paper you are transferring on to, the worse the image will come through. It seems like the ink gets sucked into the paper more or something. Transferring to a medium blue paper was a complete failure. I tried transferring to kelly green and it was alright, but a second transfer with the same image to white card stock was bright and darker, which I found odd, because with lighter papers the first image is dark and the second use of the same image is lighter.
I found that color photographs from the newspaper came through very poorly.
Black and white photos didn’t transfer well either.
Illustrations or writing with grey tones didn’t work well.
The best transfers were black and white, such as are common with clip art images. I found lots of great images in local businesses ads. Simple illustrations with clean lines came through wonderfully. Many of the small ads had small images which are sized well for using on ATCs.
I used the back of a spoon and the side of the spoon to rub with.
If I put even pressure on the entire image then it came through looking solid.
If I used the side of the spoon and wasn’t thorough then the transfer came through with scratch like images which actually was interesting and could be made to be the goal if I wanted it to be.
I was able to get one strong transfer and one weaker, more ephemeral transfer. The third transfers were very weak.
I really rubbed on one, where there was no printing, and what came through was the ink from the opposite side of the paper. It looked interesting. I had an image of a ballerina (ad for Nutcracker ballet) and then around the head and shoulders were light transfers of words.
I transferred some bold graphic checkers from an ad’s border and they came out great.
Writing gets reversed, but can make for an interesting intentional addition to a collage.
Here is the method in case you don’t know.
Cut out an image that you want to transfer.
Get your paper ready.
Put the transfer image face down on the paper where you want it to be.
Take a small piece of paper towel and saturate it with Citrasolv concentrate.
Hold down the papers so they don’t move, with fingers from one hand.
Rub the Citrasolv over the back of the image so it soaks through the paper.
Rub over the back of the image with something hard such as a spoon or a bone folder
Peek under the corner to see how is it coming through.
Stop rubbing when it looks good to you.
Remove original paper.
Put the transferred image to air dry.
You can get more than one transfer out of the original image if you want.
Make sure to wash your hands when you are done and to NOT get it in your eyes.
I see that sometimes the Citrasolv leaves a ‘stain’ on the paper from the orange oil. To avoid a splotched effect you may want to make sure the entire paper gets whetted with it so that it looks uniform.
Citrasolv is a degreaser and therefore robs your hands of oil. Use hand lotion if your hands become dry, or wear gloves while using it.
Of course take heed of all of the product warnings that are on the product label. Citrasolv is a 100% natural product which is made from the oil from orange peels. It is a strong solvent which has a great orange scent and is 100% natural. When the paper dries, it retains the natural orange smell, which I love!
Then I taught my kids how to do the transfers and they made some with my supervision, taking care to not rub their eyes when the Citrasolv was on their fingers. I had them wash their hands as soon as they finished with it.
Then my kids asked if they could try a packing tape transfer and I let them do some of those. They both decided they liked those better as the images looked ‘accurate’ and ‘real’.
I personally like the hazy, dreamlike quality of the Citrasolv transfers.
Top left, experimentation with writing. Letters come out reversed. I chose different fonts, pretty fonts and overlapped them.
Believe it or not the tree on green paper was first and the white was the second transfer.
Checkerboard border, testing to see how very plain and bold patterns look.
Ballerina on red was first transfer and the yellow paper was the second transfer. I am not sure if you can see the faint text that came out around her head, that came through from the other side of the newspaper.
I liked the image of the postal carrier.
The one on brown paper was from an ad for an optical shoppe. It is a bench in front of a small store front with window, shutters and the door. On the window pane was the name of the business. I cut that out as when I did the transfer it would have appeared in reverse.
This was quick and fun to do.
Monday, November 14, 2005
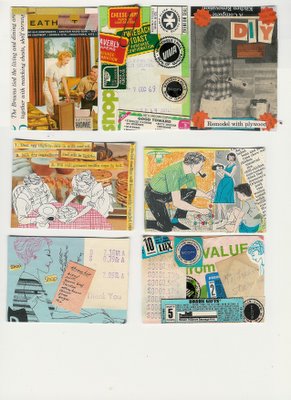
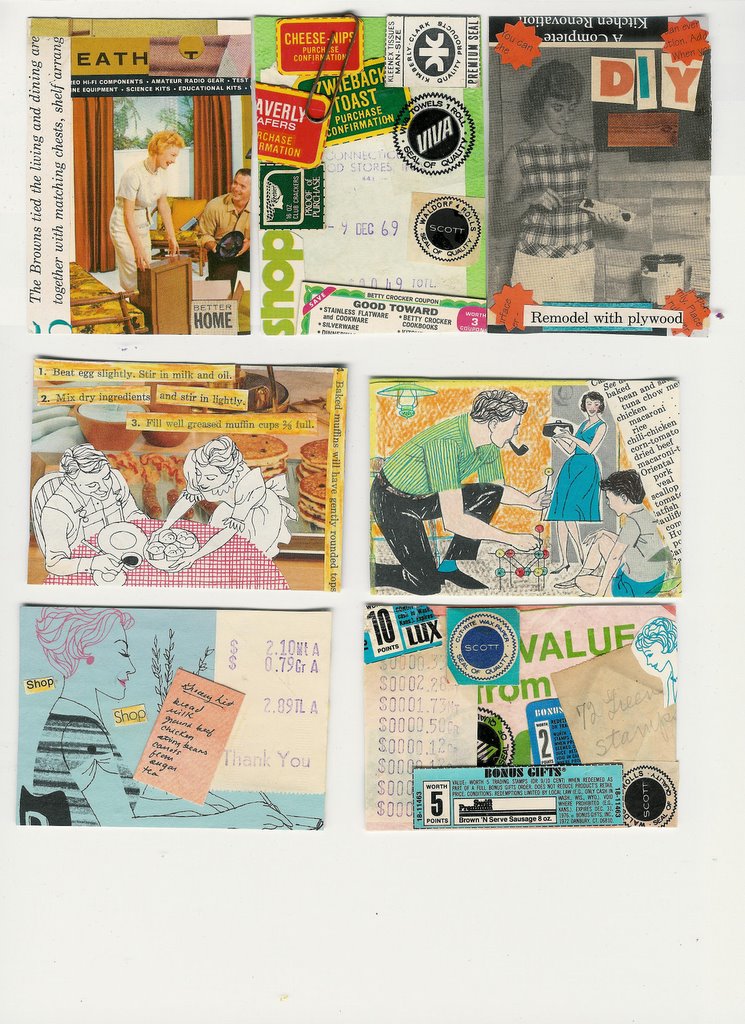
My Suzy Homemaker ATCs
I created these ATCs for a "Suzy Homemaker" ATC swap. We were to decide what our interpretation of a homemaker was. I loved some of them so much that I made extras to swap out, and I kept my favorites. I have other ideas of what a homemaker is, but I was using images from two vintage books and old issues of Mechanix Illustrated magazine, so they ended up being themed with cooking and decorating. I also made some of these with vintage ephemera that belonged to my grandmother (the grocery shopping receipts and product proof of purchases).
If I were to be more true to myself, a homemaker in the year 2005, I would have done some with images of breastfeeding, attachment parenting and homeschooling! In my own world, decorating is not high on my list of priorities as a mother. However I also was reminding myself that not all homemakers are mothers of babies, some homemakers are even senior citizens whose babies have long since flown the coop (not to mention child-less homemakers).
Let me know what you think! (If I had scanned each one individually then you would have been able to see more detail, sorry!).
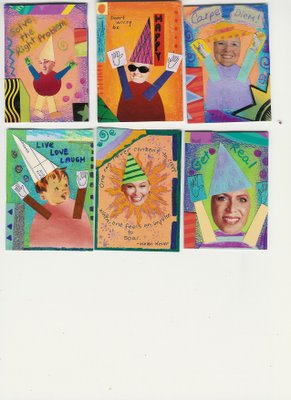
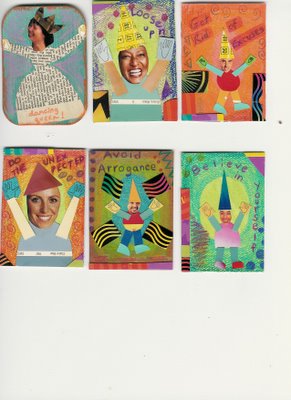
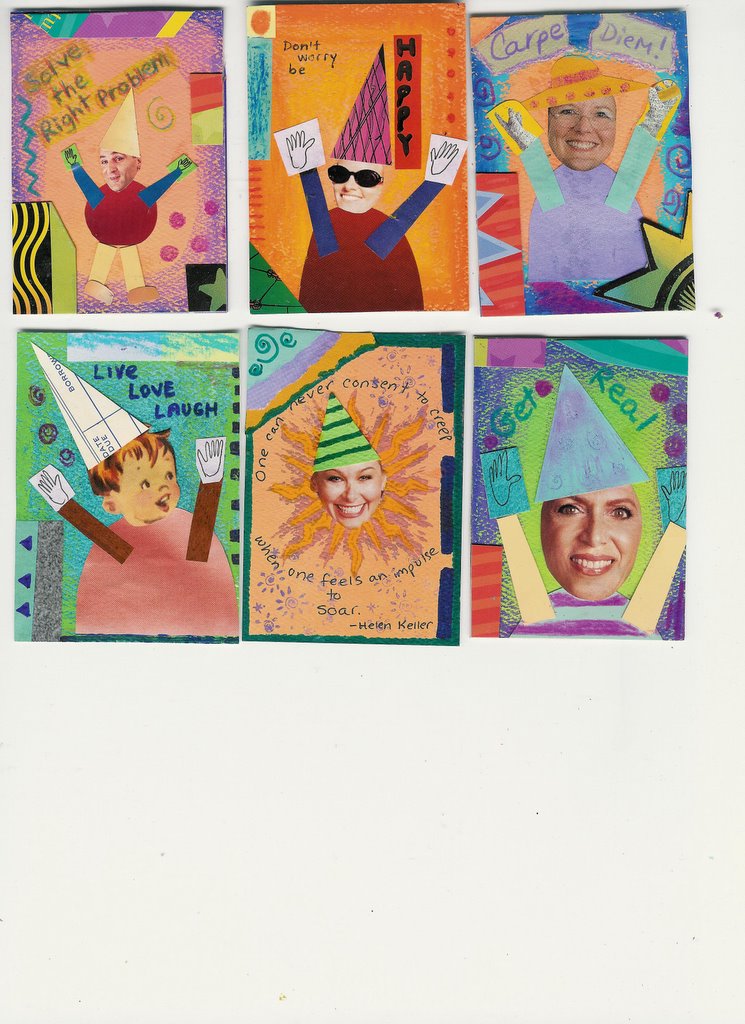
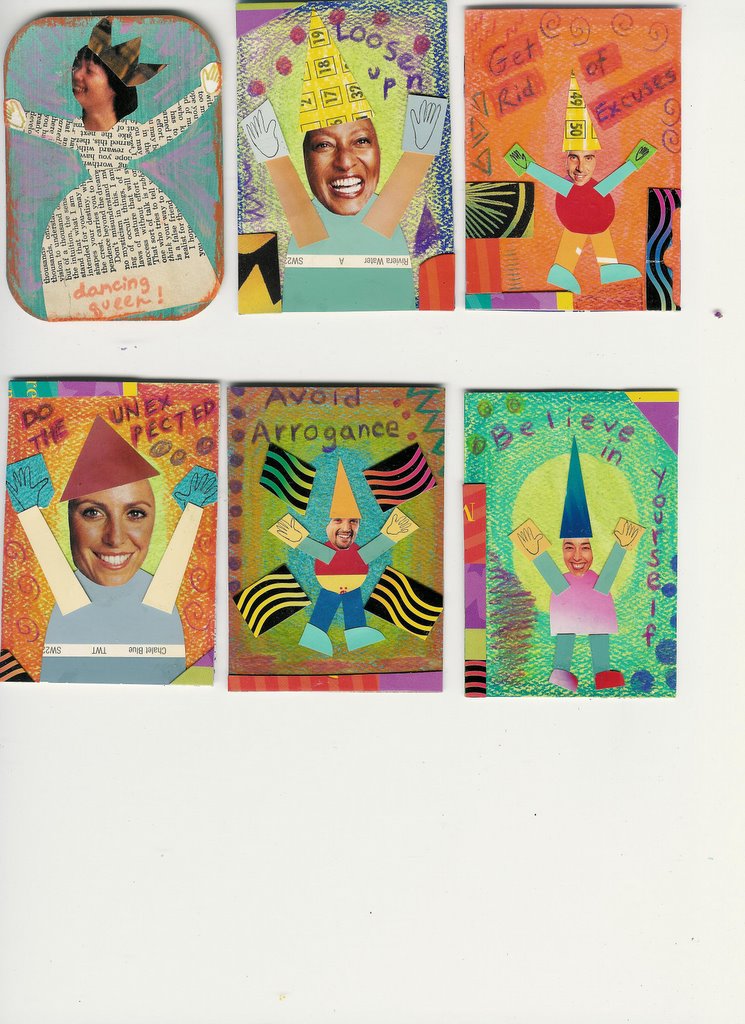
My Zettiology Style ATCs
I am participating in an ATC swap doing Zettiology style. Zettiology is a term coined by artist Teesha Moore. You can view her wonderful, unique art on her website, TeeshaMoore.com.
So here are the ATCs that I made!
So here are the ATCs that I made!
Saturday, November 12, 2005
Worked on Altered Book Tonight
I am on a little ATC vacation as I had creativity block. Tonight after dinner, I was so tired. I am 90% done with a laundry marathon but didn't have it in me to finish the last 10%. I had even folded the washed stuff and put it away (no shortcuts today). Anyway, I decided to sit down and do a little art this evening.
My first altered book is a little square shaped board book. I had coated the entire thing in brown acrylic paint. The pages had brush stoke marks, that is all.
I painted each page today. I tried things that I have seen explained in books about making altered books. Here are some things that I did:
painted acrylic paint over the page then wiped it off with a paper towel
painted it over with a color tinted glaze then:
leave the brush marks
dabbed at it with a scrunched up piece of wax paper, lightly, to leave a pattern
dabbed at it with a scrunched up piece of wax paper, with pressure, to remove some of the undercoat, revealing a bit of the original page
painted over it with tinted glaze, then scratched at it with a pointed piece of plastic, scratching down to original page then a) left it that way for bright reveal of original page and b) painted over it all over again with tinted glaze for a more muted effect
painted with tinted glaze then dabbed at it with a piece of paper napkin, with unintentional result of pattern from napkin imprinting onto the page
I painted two two-page spreads at a time then used a very small hair dryer to dry the pages.
I then used rubber stamps on top of some of the pages, selecting images that I thought would look interesting.
As I said the background was dark brown. The colors I used today for the upper coat were pale pastel pink, pale lemon yellow, cream, gold metallic, bronze metallic, copper metallic, and a tan/coffee color.
I spent about 30 minutes doing this and had fun. It really goes by quickly, when working on such small pages. The pages are only about 3x3 inches in size.
On another day I plan to root around in my ephemera and ribbon and such to collage over this on another day.
This was great fun.
(My husband was giving me weird looks while I was doing this. Whatever.)
Oh then while cleaning up I saw that my husband put a great magazine in the trash, it was loaded with great photos and bright colors for collage. So I plucked it out of the bin. I have to be stealth about this as he already calls my ephemera collection "garbage collecting".
Someone back me up here, that I am not crazy. Please.
Thoughts on Transfers vs. Rubber Stamps
Here is the epiphany that I had. It is cheaper to do transfers than to use rubber stamps.
I have not been a big rubber stamp person. Most all of the stamps I have are for my children. I just never got into it and never understood what I'd do with the rubber stamps. I used one on my wedding church program. We used embossing. I have never reused that lovely stamp, though. I own one for party invitations and I do reuse that for my children's birthday parties when I make my own invitations.
I was looking at rubber stamps yesterday and boy are they expensive (if purchased at full retail or even on sale). One image for up to $17! Wow!
It came to me that some of the images are so much like images I see on papers lying around my house. Why not do more transfers and avoid buying rubber stamps for my new hobby?
Why buy a stamp that looks like a collage image when I can just make an original collage?
So that is what I am thinking about today.
Thursday, November 10, 2005
Visit to Michael's Craft Store Today
Today I was doing an errand near Michael's Craft Store. I had a coupon that was expiring today for 40% one non-sale item so I headed over there. I picked out my first embossing kit. I plan to use this for making ATCs and whatever else I feel like doing. The kit is a liquid embossing kit and it came with four colors: gold, silver, copper and white. Full price on the kit was $14.99 (not too bad to begin with). This seemed easier than the regular embossing method, but what do I know?
I am going to try and use a small hairdryer that I have on hand here already to do the embossing with. If that doesn't work I will have to either return this and not emboss or I will buy that another day, with another coupon.
I looked at the $1 rubber stamps by Vap! Scrap and told each of my sons that they could select two each. There was a whole bin of scrapbooking embellishments at the same stand, and they were all marked down to $1. These usualy go for $2.99 to $4.99 each package. They were all very small embellishments such as are perfect for making ATCs and also would be great in altered books. Some of the packages had 12 embellishments! All of the embellishments were from "K & Company" and there were many different lines available. I didn't have any of these type of embellishments on hand so I bought some.
I had inquired when I arrived at the store, if they match the coupon for competitive stores and they said yes. I had a 40% off one non-sale item from A.C. Moore in my pocketbook. However when I tried using both they said it is one coupon per person per day even if it is a competitor's coupon. I asked to void out a rubber stamp I had bought (regular price $12.99) so she took it back from me and did something on the register.
The price on the bill seemed high and when I got to the car I checked it and she never took the stamp off the bill. I had to go back in and get this removed. The stamp was still at the register so they knew for sure I was not lying about it!
Tuesday, November 08, 2005
Started Making Christmas Ornament ATCs & Started an Altered Book
Last night after an early dinner I decided to make some ATCs. My children were also at the table. One was painting with watercolor and the other was altering a food tin with collage, to make a drum out of it. We listened to the end of an audiobook: The Horse and His Boy (in the Narnia series) by C.S. Lewis, while we made art.
I began making ATCs for Christmas ornament ATC swap. The ATC is made in the regular manner. A hole is punched at the top and it is converted into a Christmas tree ornament.
I went through last year's Christmas cards to find images to use. Yes, I saved them. Last year we used parts of other old cards I'd saved to make Christmas and Holiday cards for elderly residents of a nursing home. So I continue to save old cards for crafts.
I had trouble finding my muse so I didn't get very far. I selected cards, cut out backgrounds that was about it.
I also selected one of my children's old board books to alter. It was pure twaddle and was not a favorite of ours. I painted every surface with brown acrylic paint that I had on hand. I plan to use my grandmother's old papers to make this a vintage papers altered book. It will be a small record of the stuff that she was saving.
This morning the altered book was dry. My husband asked what it was and I explained about altered books. He was not impressed. He asked what I painted it with and I answered him. He said it looked awful and like 'a little kid did it'. I explained it is supposed to look that way. What he meant was that the paint had texture. The brush stroke lines are visible. Some are in straight lines. Some brush strokes are swirly. The paint is not flat and dark, the thickness of the paint varies. This is not unlike altered books that I have seen. Anyway this is the base. I plan to collage eon top and use many layers of glaze as well. I am not put off by his comment.
Sunday, November 06, 2005
Having Second Thoughts About Using Books for Artwork
After looking at the books I bought to use for art, I am having trouble doing it.
I was looking at a guidebook to US coins which is a value guide. It is from 1987 so it is out of date. However it is interesting to read and educational to boot (if you ignore the values). So I was thinking perhaps we should keep this around the house for an educational thing for our homeschooling. I paid $1 for it. Then I thought that maybe sometime I'd but a current one, new, to use for that purpose. I am conflicted. My intent was to cut out the coin images and use them in collages for ATCs and altered books.
I bought a quote book, an inspirational book about teachers. Some of this applies to me as a mother who homeschools her children. I also like the small square format and thought I'd make an altered book out of it, blocking over the quotes that I don't like or that only really apply to school teachers. Now I am having second thoughts.
I bought a really cool book from 1949 for $1. It is in very good condition and is a hardback in a small format, about 5x7 inches. It is called "The Winter Book of Switzerland" by Dore Ogrizek and J.G. Rufenacht. It is loaded with color illustrations and maps. It is a travel guide. This is very high quality and written with wonderful English. This book makes the modern travel books seem like pieces of junk and also that they are boring and dumbed down. Now I don't want to use this book. I thought I'd either alter it or take it apart for the illustrations. To boot I see it online for a minimum price of $12.
The German dictionary from 1914 is really gorgeous and has such a great font. I am having second doubts about using it in art. However I ask myself why would I or someone else buy 4 sheets of a foreign language book on eBay or from online collage suppliers for $1 or $2 when here I have a book that I paid $2 for and I have hundreds of pages?? If I thought I could really sell some of these pages I would do it, and make some money!
I own a book on children and the American public schools, in paperback. I bought a hardback version yesterday to turn into an altered book. It is not a great book. So that is solid. No, wait. My copy is paperback and perhaps I should save the hardback for a reading copy instead of saving the paperback copy. But where would that leave me--it would leave me without a base for an altered book.
There is a library sale in my own town next weekend. This sale will be $1 for every hardback book for adults. I think I will go to that and pick out some books to use for altering. The sale that I attended yesterday was charging $2, $3 and up for the hardback books.
Saturday, November 05, 2005
Bought Glazing Medium and Books at Library Sale
Okay after 4 days of not leaving the house, last night I got cabin fever. (We were quarantined with a very contagious virus with one of my son’s and the other was sick as well.) Anyway when my husband got home, I burst out of here to go where? To the big craft store with my 40% off one non-sale item in hand.
At the top of my list of things to buy was acrylic glazing medium. The store had only one brand of Glaze in the whole place (Plaid Folk Art--2 oz for $3.99) and it was sold out, confirmed by sales person.
I bought a die cutter in the shape of a postage stamp with my coupon, to use for making collage and ATCs.
They had Anita's acrylic paints on sale for 4/$1. I picked out 4 brown tinted colors to use to make things look vintage.
I really wanted the glaze so off to Home Depot I went (2 minute drive away) and faced the large and scary paint dept. (Did I mention I hate going into Home Depot and avoid it at all costs?) Found a quart of Behr brand “Faux Glaze” for $8.50 (what a bargain). Picked up a few paint samples and a few formica countertop samples for crafting, and ran home to try the glaze.
I knew I was saving those 1 oz. glass jars from hotel condiments for something…I had 16 saved in a box of stuff to use for arts and crafts. They are now filled with 16 different colors of glaze. I used the new colors plus acrylic paints and artist pigments that I already owned.
Wow, this the glaze is great. I tried it on some sample papers. I can’t wait to make ATCs with it.
I also am starting my first altered book tomorrow. Yippee I am happy.
Actually the instructions for how to use the glaze on the wall seem so easy I may just be the one to paint the bathroom which we peeled the wallpaper off of 4 years ago but it remains unfinished…
Oh and on the spur of the moment I went to a library book sale today and bought some books to use in making ATCs and also to use as altered books. That is the ultimate bargain—buying books for $1 or $2 and getting lots of pages to use to make art. I got a great German dictionary and a 5 inch thick English dictionary and an antique book with fish diagrams and an antique trig math textbook plus the ones I will turn into altered books.
My other time today was spent doing housework. Tomorrow I hope to make some art.
Friday, November 04, 2005
How To Figure Out if Something is in the Public Domain
I am reading a book on the art of collage published in 2004, Collage Discovery Workshop by Claudine Hellmuth. Apparently there is a bit of controversy about using copyrighted images and words in new works of art/collage.
This book refers readers to read about the issue at this site: an article. I have not read it yet.
But here is the better thing. Here is a whole book about how to figure out if something is copyright free or not, checklists and directions.
The Public Domain: How to find and use copyright-free writings, music, art & More by Attorney Stephen Fishman ISBN 0873374339
$23-ish in paperback on Amazon
Anyway I see one Amazon reviewer said he is republishing books which are in the public domain and this book answered all of his questions.
Then again $23 is a very low investment in a business venture or career, isn't it?
Maybe I could use this to start some new home based career for myself… and make our family some money. Hmmm.
Thursday, November 03, 2005
Big ATC Making Day Yesterday
My children are sick. One child has a very contagious viral infection. Responsible parents will heed the warnings to quarantine children who have this virus, so that is what I am doing. This means our various plans, classes, and playdates are all cancelled. The other son is also sick with what looks like the beginning stages of this same sickness, so he is quarantined as well. We homeschool so they don’t have to go out of the home to go to school. But while so sick with fevers that come and go, doing homeschooling academic work is not appropriate. So we have a lot of free time on our hands. When not resting, napping, or sleeping late in the morning, they are playing or making art.
Yesterday both boys were feeling pretty well. My older son got up first and I asked him to put something away in the basement. While down there he saw a Scratch Art kit and brought it up and asked if he could do it (of course I said yes—I have no limits for my children doing artwork). When that first kit was finished, he went back down for another kit. When my younger son woke up, he joined right in. They ended up tearing through all of the kits. I had bought these 1.5 years ago and after doing them a little, they sat untouched all this time (stored with my art supplies in the basement). All total both children worked on them nearly continuously for 10 hours yesterday! We had all four styles of these Scratch Art kits. My older son was even developing a blister from the wooden stylus so I suggested he try wearing a winter glove on that hand, which he did, and it worked. Pretty funny, huh? He was too into making the art to stop just because of a blister.
Anyway my point in mentioning this is that this was a rare opportunity for me to do something fun for myself. That meant that most of the day I made ATCs. I made them right at the kitchen table while my boys did their artwork.
Also another reason that they were happy to stay in the kitchen for so long was that we were listening to the second half of the audio recording of "Harry Potter and the Half Blood Prince" by J.K. Rowling This audio book was due back to the library the following day, so we had a deadline to meet, and we all wanted to hear the rest of the story anyway!
The children and I actually really liked doing art while listening to a long audio book. We all had ‘the flow’ going. It is easier to keep in the flow mode while listening to a long story versus watching live television with the annoying commercials, in my opinion.
I made one ATC for a “winner takes all” contest. People enter one ATC and one winner gets all of them. Actually this month they are doing “winner takes half” and there will be two winners, but you get the gist—usually there is just one winner. This month we were to make one with a vintage theme.
I made a set for a swap called “Suzy Homemaker” in which we were to put images of what we think of when we think of homemakers.
Both swaps were 100% finished including putting the backs on, scanning them, packaging them to send out, and even putting them in the mailbox.
If I have time I will put these ATCs up on the blog and will share a little about the technique and the thought process behind them.
Each time I do a swap, I also am now making a couple of extra ATCs and keeping them for myself.
The new-to-me way of doing swaps is working well. I find swaps that I would like to do. I make the ATCs first. Then when they are 100% finished I contact the hostess to sign up and I mail them out immediately. In some cases my ATCs are going out a month or more before the due date. I find this is less pressure for me, and all the work is done for fun. It was not fun last month when I realized a deadline was looming and I was forced to make the ATCs under pressure.
Tuesday, November 01, 2005
Currently Reading “Altered Books Workshop” by Bev Brazelton
This week I decided to try out my idea for buying books on art techniques using discount coupons for A.C. Moore and Michael’s (craft stores). While visiting my parents (who subscribe to the nearby city newspaper) I checked and found that A.C. Moore (a craft store chain) had a 50% off one non-sale item coupon, and Michael’s had a 40% off a non-sale item coupon. So I clipped them.
Yesterday I went shopping. A.C. Moore and Michael’s are about a 5 minute drive away from each other, so I went to both in one day.
I was looking for the various books by Beth Cote. I didn’t find any of Beth Cote’s books. Darn. I am surprised that neither store carries her books!
At A.C. Moore I picked up “Altered Books Workshop: 18 creative techniques for self-expression” by Bev Brazelton. The full retail is $19.99, so I paid $10.00.
I have not made any altered books (yet). I bought this because many of the same paint and collage techniques can be used on ATCs.
I began reading it last night and have read it at nearly every opportunity that I have had today. I am more than half-way through it.
One thing I have learned so far is that the look that I have wanted to get is done with glazes. These are a type of acrylic medium that is clear. You can add any color of acrylic paint to it to tint it. These dry transparent. This is what my collage ATCs are missing. I have felt sometimes that my images are too bright or too new looking. Other times I like the image but feel that in its’ original paper color it is dull. I now know how to use glazes (by the book). I can’t wait to get my hands on some glaze so I can give this a try in real life.
Also of course, now I want to try making an altered book. So many things to do, so little time.
Oh, the other book I bought at Michael’s was "Collage Discovery Workshop: Make Your Own Collage Creations Using Vintage Photos, Found Objects and Ephemera" by Claudine Hellmuth. This book retails for $22.99 so I got it for 40% off = $13.79. I haven’t looked at it yet. I will blog about it after I read it.
In the meantime I had bid on some Beth Cote books on eBay but lost the auctions. Oh well, I will try again if I find any more of Beth Cote’s books on eBay (ooh—I should try half.com as well!).
Subscribe to:
Posts (Atom)

