This was a regular color photo which was taken in the early 1980s.
I decided to experiment to see what would happen if the photo was left for a longer period of time, in the bleach and water solution.
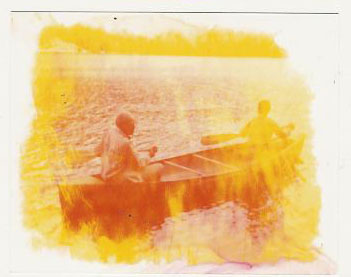
As I have said before, you can watch the edges of the photo to see how much of the photo's color emulsion layers are being eroded by the bleach solution. This photo has quite a wide white border on it, which is just the white background paper.
You can see that all of the top blue emulsion is gone because not a trace of the blue is left in the photo.
Some of the second layer of red emulsion is also gone.
The pine trees in the background were green, originally. When the blue layer went off, they change to red. Since most of the red layer is gone from this photo, the trees are turning yellow.
The yellow streaking going across the canoe cannot be controlled. It just happens.
The strange red or pinkish colored mottled look near the bottom was caused by the photo being very wet and laying flat to dry while still very wet. What happened was when I laid the paper down to dry, the puddle was there. There must have been some chemical changes still occuring because more red emulsion lifted off the photo as it laid to dry. The red emulsion puddled there and since I didn't wipe it off, it dried in that way.
I learned through this process that if I don't want that effect to possibly happen there are a couple of things that I could do to stop it. One is to do two clear water baths, as I outlined earlier, but I later realized that perhaps the reader may assume was a typographic error on my part. It was not a mistake. Another thing that can be done is to change the first water bath frequently as the more it is used, the more bleach ends up in the water and the less that first bath will do to completely stop the process. Something else I tried was that after removing it from the second water bath, I rinsed it under a running faucet. Lastly, I shook the photo to try to get all the water off of the surface.
I also once tried blotting the front of the photo with a dry paper towel but found that sometimes doing that alters the photo further, by making color changes in the emulsion in the textured shapes that are in the paper towel. If you don't want a pattern put into the surface of the photo, don't do this. Then again if you want to press shapes into the photo, that could be an intentional thing to do.
Once I tried to speed the rinsing process by wiping my finger across the front of the photo while it was submerged in the clear water bath. I found out that the friction of my finger actually wiped away more of the emulsion, further altering the photo. What it did was wipe away the coloring of the image that was there down to all yellow and sometimes down to the base white color, erasing the image completely. This could be another thing to experiment with as it is possible to basically erase sections of the original image if you wanted to.
In this process everything happens quickly and little is truly under control. I don't feel in control of the process but mostly the faciliator of it and I never know what the final result will be. The finished result is not seen until the photo is completely dry.


1 comment:
Very interesting, Christine! Thanks for the step by step of what you did and description and pictures of results. I read through this entry, but didn't have time to read the previous ones yet. Maybe in a few days or a week. Things are cRaZy for me at the moment.
Post a Comment