Monday, April 10, 2006

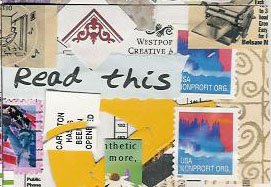
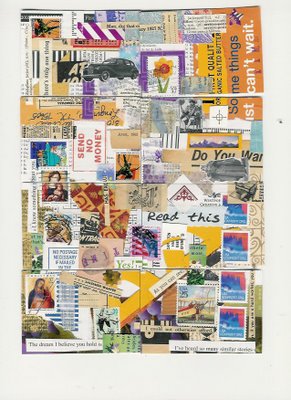
My ATC: Read This


ATC Title: Read This

The last in the set of 8 ATCs which I made from a 'block collage'.

This contains these elements:

butter box cut-out's (flower image and phrase 'carton has been opened')
McDonald's Happy Meal box handle
used stamps from junk mail
clippings from 1956 and/or 1963 Mechanix Illustrated magazine
fancy paper given to me by an ATC swapper
background paper is a map of a craft fair

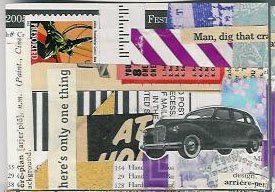
My ATC: There's Only One


ATC Title: There's Only One

This is another ATC from the set of 8 that I made from a block collage last week.

Some of the items used were:

purple and white candy cigarette (!) wrapper
car image from Dover books mail order catalog
paint chip sample from home improvement store (gold sandpaper type textured paint)
stamp that came on junk mail
junk mail clippings
clippings from 1963 Mechanix Illustrated magazine
French dictionary page
background shows through: craft show map and guide to vendors
clipping of phrase "There's only one" from junk mail letter

Technorati Tags: , , .

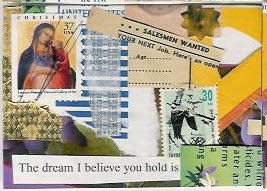
My ATC: The Dream I Believe


ATC Title: The Dream I Believe

Yet another of the ATC set of 8 that I did from a block collage.

Some of the items used in this collage are:

McDonald's Happy Meal box handle
cancelled Christmas card stamp from Christmas card received in 2005
butter box cut-out's
gold foil paper from a chocolate candy wrapper, Christmas gift I received
help wanted ad from 1956 Mechanix Illustrated magazine
junk mail clippings such as the "no postage necessary" return envelope piece
tissue paper with stock quotes which came in a box of new men's shoes as a packing material
die cut from a magazine page (done by one of my son's)

Technorati Tags: , , .

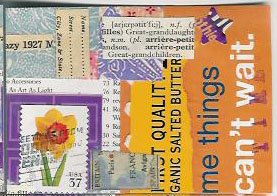
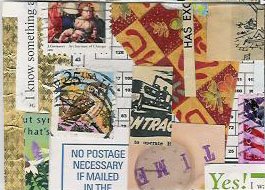
My ATC: Some Things Can't Wait


ATC Title: Some Things Can't Wait

Another collage ATC from a 'block collage' which yielded 8 ATCs.

Some items on this ATC are:

colorful clippings from magazine pages
cancelled stamps from an ATC swap
butter box cut-out's
magazine clippings from Mechanix Illustrated from 1963
colorful papers, a gift from an ATC swapper
die cut star sent to me by an ATC swapper
rubber stamped word "time"

Technorati Tags: , , .

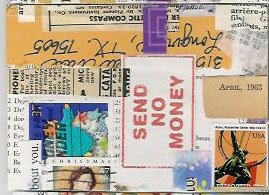
My ATC: Send No Money


ATC Title: Send No Money

This is another in the set of 8 ATCs cut from a 'block collage'.

Some of the items used in this ATC are:

cancelled stamps from Christmas cards received in 2005
stamps from junk mail
address from an envelope from an ATC swap
French dictionary page
clippings from Mechanix Illustrated magazine, 1956 & 1963
magazine clippings
fancy paper given to my by an ATC swapper

Technorati Tags: , , .

Publishing a Book in CD-ROM Format: A Great Idea from Lisa Vollrath!

Now here is a great idea from a creative entrepreneur. Lisa Vollrath is an artist. She has been publishing an e-newsletter called The Monthly Muse. (You can download one free trial issue, here.)

That idea in and of itself to publish an e-newsletter is brilliant as she can write her articles and receive payment for them but does not have to deal with the hassles of printing and distribution of paper newsletters. I think of the e-newsletter as kind of a blog or a website in another format, which people pay to read.

Now Lisa Vollrath is publishing a CD-ROM which contains PDF documents and clip art. This is not an e-Book as the content is not transmitted from a website onto the customer’s computer hard drive which is what an e-Book is. You buy the CD-ROM then view and read the contents on your computer. I am guessing that you can print these off on your home printer if you want to read it on hard copy.

You can also use the clip art digitally or can print it out onto paper to use. Note the Angel Policy about use of the clip art.

The offering at present is a CD-ROM “How To Collection” about Paper Art Dolls. You can read about it here. The cost is $9.99 plus shipping.

What a great idea to publish a book on CD-ROM. The publisher is cut out; the copies of the CD-ROM can be made right on a home computer. This is a unique form of self-publication with little up-front costs and no worry about where to inventory and store the product!

It seems to me that the hardest thing is the layout of the documents, making the documents look appealing to the eye. Also one would have to purchase the Adobe program to convert the computer files to PDF format.

Hmmm, perhaps I should use this model to publish some sort of CD-book or whatever this type of ‘book’ is called!

Technorati Tags: , , , , .

Sunday, April 09, 2006

My ATC: No Postage Necessary


ATC Title: No Postage Necessary

One in my 'block collage' ATC set of 8.

Some items on this ATC are:

Butter box cut-out images (flowers)
Gold foil from a chocolate wrapper (a Christmas gift I received)
cancelled Christmas stamps from Christmas cards sent to our family
cancelled stamps from ATC swaps
junk mail snippets
snippings from scraps of Mechanix Illustrated magazine from 1956
fancy paper sent to me by a fellow ATC swapper

Technorati Tags: , , .

ATC Title: Do You Want


ATC Title: Do You Want

One in my 'block collage' ATC set of 8.

Some items on this ATC are:

butter box cut-out's
cancelled stamps from someone who sent me ATCs (from Canada)
images from Dover mail order catalog (Queen, King)
junk mail pieces (orange piece and lots of the white and black pieces)
phrases from junk mail
snippings from scraps of Mechanix Illustrated magazine from 1963 and 1956
tissue paper that came in shoe box with new men's shoes (has stock quotes on it)
snippets from newspaper including colored images

Technorati Tags: , , .

My ATC: As You Can See


ATC Title: As You Can See

One in my 'block collage' ATC set of 8.

Some items on this ATC are:
used stamps from junk mail
cancelled stamp from an ATC swap
McDonald's Happy Meal Box handle
junk mail pieces
phrases from junk mail
snippings from scraps of Mechanix Illustrated magazine from 1963 and 1956
paper from a 'collage paper' pack from the craft store

Technorati Tags: , , .

Friday, April 07, 2006

Second Set of ATCs of Block Collage Method With Ephemera Made


Ephemera Collage Artist Trading Cards

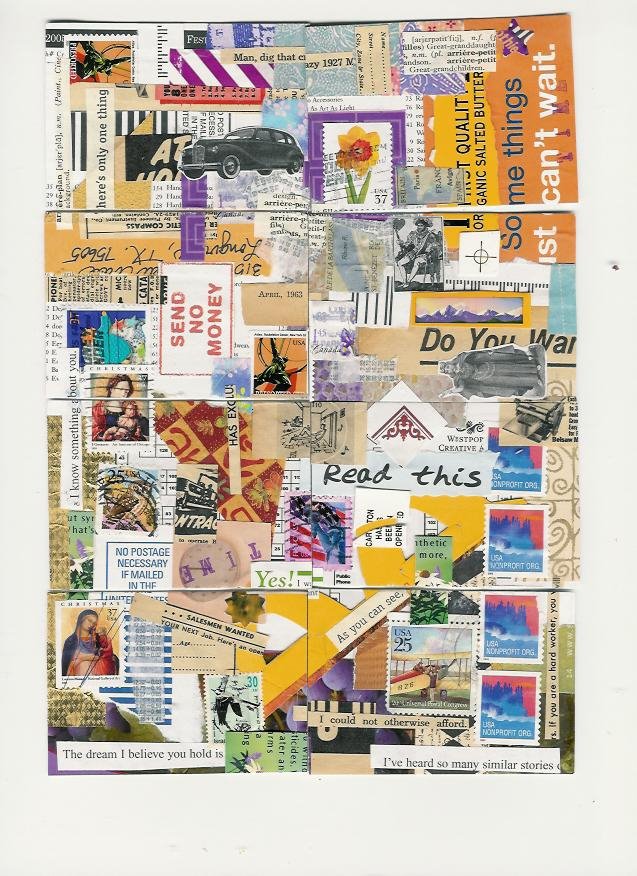
Here is my second set of ATCs which I made in the method of a block collage. I made these a few days ago. I made this while procrastinating about finishing two presentations I will be giving at a conference this weekend!

Unfortunately I cut the collage into ATCs before I scanned it. I really wish I had scanned it first.

This was my process.

I started with a thin cardboard piece which was 7.25 x 10.25 inches in size, so that eight ATCs would be made out of it, with a little room for cropping in case I make a cutting error.

I selected a 8.5 x 11 inch paper which was a map of a craft fair for the background. I did not attend the craft fair, it was actually an insert in the local newspaper acting as an advertisement for the craft show. I liked it because it showed a map of the building and all the little booths then had a lot of numers and tiny font with the names of the crafters on it. Most of this ended up being covered up but I liked the way it looked. It was black ink on white paper.

I took the junk mail and catalogs received in the mail that day. I skimmed the letters asking for charitable donations and cut out some phrases. I cut out some images from the letters and paperwork received. One had a full color envelope with photos on it. I cut out some of the things that say "postage paid" on the return envelopes.

I used some cancelled stamps that I had on hand (I stopped throwing away stamps when I began making ATCs).

I went through some saved papers from past magazine skimming and cutting. I keep those in a accordian type paper organizer thing that I found at the dollar store.

I went through some papers that people have sent me when I hosted the swap. This is interesting to do because they give me stuff that is different than what catches my own eye to save or stuff they bought that I don't buy.

I grabbed a Dover catalog ...
(you should consider get on their mailing lists, they have great small images in black and white and some in color)...you can fill out an online form to say which catalogs you want. You may be surprised to know that the children's catalog is full of non-fiction stuff, such as showing famous people in history or even period costumes and other interesting old images. I cut out some small images from the Dover catalogs. I am actually a customer of Dover and own a large number of their books, so I don't just get the catalog to raid for images to use in artwork!

I glanced around the kitchen and took some food labels such as butter box pieces. I had a McDonald's Happy Meal Box on hand and used part of that--the "M" shaped handle of the box.

I also had decided the 2nd set would concentrate on golden yellow and purple, so I looked for things with those colors. I decided that color scheme just because some items I had with those colors caught my fancy at the time.

I had a newspaper given to me for free and I glanced through it and found some words and also some maps.

I then looked at tiny scraps from past collage work from some 1956 and 1963 magazines--I love the color of the aged paper (from the oxidation of the acid in the paper). I put the tiny scraps in a very small Rubbermaid container. It is fun to dump this out and root around to see what is there.

I also had some old books that I bought for as low at 50 cents intentionally for ATCs, a French dictionary was one, and cut some stuff out of that.

I used some images from mail order catalogs also such as sizing grids, lists of tiny font letters which listed out retail store locations, (I also love the sizing charts).

Some of the layers are 6 deep in this collage. I made a concerted effort to use tiny items so that this time each ATC would have a lot more tiny elements on it, to be busier.

By the time I felt I was done I didn't feel like adding paint or rubber stamped images to it, so I inserted one word "time" in rubber stamps and otherwise left it otherwise as a plain collage.

I used Golden soft gel medium as the adhesive. I really enjoy using this product. I apply it either with a foam brush or with my fingertips.

Also I should say that sometimes I pick up a piece that I like, put the gel medium on the back and then and only then, do I find a place to put it. Rushing like that to get it on before it dries helps me make impulsive decisions and to not worry about what I am covering up. I used to have this problem with ruining or covering up the good thing that was already on there which I wanted to keep in one piece. I am getting over this.

I was impatient to see how the individual ATCs came out so cut it while the gel medium was still damp.

I really have fun doing this method and think I will continue it as I have time. I am trying not to think about others who may think this looks like a mish-mosh. There really is a thought process and an attempt to select colors that look well together or placements that are pleasing to the eye. Sometimes I have themes going. It may not seem that way but that does go on in my mind. I would estimate that I spent nearly two hours on this collage which then ended up being eight ATCs, so this is not as time consuming as when I set out to do a similar looking collage in the size of one ATC--that takes me about one hour per ATC.

I enjoy the surprise of seeing how each ATC comes out in the end. The ATCs look different than if I had tried to make each one individually. I still do have that concern like "Oh, I can't cut this stamp into four tiny pieces and use just the corner" but if I make a big collage then chop it up and end up with 1/4 of a stamp on it, it is 'acceptable' to me.

I am really curious about people think about the look of these. Please consider leaving a comment here on Blogger or by emailing me (click on the link to my profile and you will see the link to email me).

Hope you like them.

Addendum: One person is encouraging me to offer this type of a 'method' and style as an ATC swap. I am seriously considering it. I do wonder how many would be interested, this is so against the style that is popular now that I don't know how many would actually participate. However I have Teesha Moore's voice inside my head telling me to not worry about what others think, to just do what I enjoy and to have fun with it.

Technorati Tags: , , , .

Thursday, April 06, 2006

PostSecret has a Hilarious Postcard This Week

Love this postcard which appears for this week only on PostSecret.

"I buy handmade cards on eBay then tell people I made them."


Hilarious!

You can view PostSecret, here. PostSecret is updated every Sunday. You cannot view archives, so check in weekly if you want to see them.

Note that the content of the postcards vary and some may be offensive to you or may not be appropriate for minors (may contain adult content) or may be emotionally disturbing (victims of abuse), etc. You never know what someone's secret is!

Technorati Tags: , , .

Wednesday, April 05, 2006

Online A.C. Moore Coupon Link & Michael's Coupon Info

I just discovered this a few days ago!

It appears that the weekly coupon for A.C. Moore is available online, for free! You can print off numerous copies if you are going to visit the store more than one time in the week.

In my area, there is a Michael's Craft Store one mile away from A.C. Moore. Both Michael's and A.C. Moore accept their competitor's coupons. Therefore now when making a craft shop run I can print off these coupons for free and then hit both stores on the same day, to buy two things instead of just one thing per shop.

These coupons are also in the newspaper but I don't subscribe to the newspaper.

The A.C. Moore coupon comes out on Wednesday. The Michael's coupon comes out on Sunday. (If one comes out.) The coupons have been coming out nearly every week for the last eight months since I've been shopping in those stores again.

According to the Michael's craft store website, they don't release their coupons online.

Technorati Tags: , .

Tuesday, April 04, 2006

My ATC: Durham Fair


ATC Title: Durham Fair

This is another of the six mixed media collages that I made today as part of a block collage. For more information about my process read the blog entry I made earlier today.

(I did the scan before I trimmed the edges for neatness. Sorry!)

Technorati Tags: , , .

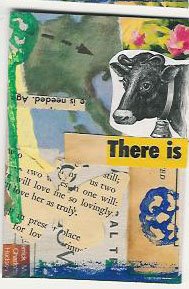
My ATC: There Is


ATC Title: There Is

This is another of the mixed media collage ATCs that I made earlier today and blogged about earlier today.

(Sorry, the scan was taken before I trimmed the edges for neatness.)

Technorati Tags: , , .

My ATC: Plastic


ATC Title: Plastic

This is another ATC made from a mixed media collage that I blogged about earlier today.

(Sorry the scan was taken before I trimmed the edges for neatness.)

Technorati Tags: , , .

My ATC: Sweet


ATC Title: Sweet

This is one of the six mixed media collages that I blogged about earlier today.

(Sorry, the scan was done before I cropped the edges for neatness.)

Technorati Tags: , , .

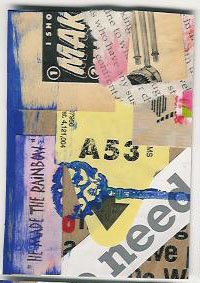
My ATC: Need


ATC Title: Need

This is one of the six mixed media collages that I blogged about earlier today.

(Note: scan done before I finished cropping edges to make them look neater, sorry!)

Technorati Tags: , , .

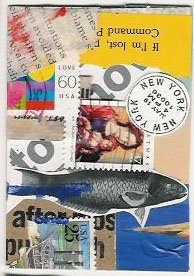
My ATC: If I'm Lost


ATC Title: If I'm Lost

This is one of the six in the block collage project that I blogged about earlier today.

(The scan was done before I cropped the edges for neatness, sorry!)

Technorati Tags: , , .

Collage ATC Set Made Today


Today I made this collage. The inspiration for this was an ATC which I received as part of an ATC Art Box Swap a few days ago. I liked it so much that I wanted to copy the general style of it.

I also was inspired to do this today because I wanted to use small ephemera elements which I received in yesterday's mail which were a little gift that went along with a 4/4 blind swap that I did with someone on an ATC Swap list.

I chose a piece of thin cardboard from a food container. I sized it to be equal to 6 ATCs, and kept it in the large size, to be cut up later.

The main base covering that I put on the cardboard was a Wendy's fast food restaurant bag which is what my lunch came in yeserday! I made the collage using ephemera I had on hand, such as tea bags, cancelled stamps and other random scraps from past ATC making sessions. I used clippings from a free sample of the New York Times which was received yesterday, scraps from my town's newspaper and some images from mail order catalogs which arrived in the mail in the last few days. I also used some tiny scraps from a 1956 magazine.

I added some rubber stamped images with acrylic paint, and painted a bit using stencils.

I used Golden Soft Gel Medium, matte as the adhesive and it worked GREAT.

When making the collage I was making an effort for it to look nice overall as a total composition. When I finished I had no idea what it would look like when it was cut apart. Rather than worry about it any longer I went directly to the cutter and sliced it into 6 ATCs.

I took this scan before the trimming of the edges was done. I wanted to be able to see what it looked like as a whole. Perhaps I should have scannd it before cutting it apart. (I will trim the edges to make them look nicer before I swap them out.)

I am pleased with the result of how the ATCs look by themselves.

I have a discomfort with using just parts of images, such as cutting a postage stamp and using just part of it. However with this method my final ATCs ended up with tiny bits and pieces of various ephemera and it looks like I intentionally used tiny pieces of stamps and such.

Let me know what you think!

Technorati Tags: , , .

Affirmation ATC Swap Being Delivered

The Affirmations Swap of ATCs that I hosted are arriving at their destinations.

The recipients are posting their words of gratitude and compliments to the various artists. I really like that on this particular ATC list that we thank each other and express kind words to show appreciation for the unique art that is made by our fellow ATC swappers.

I really like hosting ATC swaps. One of the best things is being able to see all the great ATCs right in my own hands. I find this inspirational and in this swap alone have learned a new technique and received ideas that I can try.

Technorati Tags: , , .

Wednesday, March 29, 2006

Busy This Week Being ATC Swap Host

Here is what I have been up to: hosting an ATC swap. A swap I was hosting is coming to an end. I was busy in this last week updating my spreadsheet with list of participants in the swap. I was emailing people who were late or very close to the deadline with sending in their ATCs. Once I firmed up the last minute drop-outs, I was ready to swap out the ATCs. Only two were late, and they were just one mailing day late.

Sunday night after the kids went to bed I spread out all the envelopes on the floor and looked everything over. It was the first time I looked at all of them as a whole.

Monday night after the kids went to bed I again spread out all the envelopes and ATCs and swapped them out. I realized I hadn't labeled the backs of the ATCs that I made, nor had I scanned them. Darn.

Tuesday I made the backs for my own ATCs. I scanned my ATCs also.

I made one ATC for each participant and I was able to then keep the equivalent of one ATC from each participant. I glued the backs to the ATCs. I also gathered the special cards that I made which have the date and the name of the swap on them. Later I added one of my own ATCs to each swap and the other card that I made. I also wrote a little note to each person thanking them for participating in the swap. After a final check, I sealed each envelope. (I just realized I didn't do a double-check to make sure that I didn't swap a card to its creator, darn!)

Using our digital kitchen scale I weighed each envelope and noted the weight. I then went on the Internet to check postage rates for each envelope on the USPS website. One came up short and two came out exactly right. I had to add my own postage to the one that was short. I will have the post office recheck those three packages just in case my scale is a bit off from the post office's scale. I am trying to avoid paying extra money out of my pocket to make up for not-enough postage sent by the participant.

I have three swaps to be sent to other countries, so those will necessitate a trip to the post office as well.

Last night after the kids went to bed I sat down and looked at the goodies that some of the participants sent me. As a gift some participants sent me little gifts such as cancelled postage stamps, scraps of interesting paper, embellishments, and other ephemera. The international participants also had to send me ephemera in lieu of the postage that I have to pay out of my pocket to send the package to them. It was interesting and fun to get some papers from other countries. I hope to use these things to make some ATCs. I am itching to make ATCs but just haven't had the time!

The plan for today is to go to the post office, post to the chat list that the swap was sent out, and then to relax!

I also now have yet more scans of my own ATCs that I have to reconfigure in Photoshop before I can upload them to this blog or to the chat list photo albums. I also have some left over ATCs of my own that I can trade privately with other people.

The most fun thing about hosting a swap is seeing lots of other people's ATCs and being able to not just view them on the Internet, but to hold them in my hands and look at them closely. From experience I can tell you that sometimes things looks better in real life then on a scan.

This was a 5/5 swap, so they send in 5 ATCs and they get back 5 ATCs. The benefit to me is that I get to pick my most favorite ATCs to keep so long as I make one for each person. One thing that was interesting was that I was choosing the printed messages that I liked the best and then realized that I had three ATCs from three different people with the same message on them! I then re-swapped them around so that I didn't have three nearly idential messages.

The ATCs varied greatly in style and method. There were some very creative ideas and I learned one new technique as a result of hosting this swap (using clear ultra thick embossing enamel as a top coat which I blogged about last week).

I hope the participants are as happy with this swap as I am!

Technorati Tags: , , , .

Sunday, March 26, 2006

Thrift Shop Finds, Almost Ready for Beeswax Collage

I have been itching to try beeswax collage. I already own a book which outlines the directions; it is Claudine Hellmuth’s “Collage Discovery Workshop”. The things needed to do it are beeswax, a heating device that stays warm while in use (not a microwave, not a stovetop), and an iron with a flat bottom or a quilting iron.

Not following the directions, I once tried doing this by microwaving the wax. It didn’t work because the wax cooled too fast and I just could not do the work fast enough. (Later I read that the beeswax can actually explode and catch on fire in the microwave! I won’t be doing that again!)

Last week I went to thrift shops in search of a certain board game (Life) that my boys were asking for. I didn’t find it in a thrift shop but I did find a used electric skillet for $4.99, which I can use for the beeswax collage. (I had seen a product in the craft store that can be used for beeswax or UTEE heating and the retail on that was $34.95, yikes!)

(I still need an old iron with no holes in the bottom or a quilting iron.)

If you want to learn more about beeswax collage, read Claudine Hellmuth’s book. You may also find some information on the Internet. There is also a Yahoo Group! on the subject of beeswax collage which features a files section with information, plus the usual chat.

One other thing I found in one thrift shop was sewing patterns. Some artists use them as the background for collage. I found a whole basket full for 25 cents each. I limited myself to four patterns. I made sure to check the patterns looking for ones on the thin brown tissue paper. Since the patterns were old I was happy to find the papers in different shades of brown. Some of the others for sale were on thick white paper (which is not what I was looking for). Hooray!

Thrift shops are hit or miss. In that thrift shop, I had never seen sewing patterns before, but all of a sudden they had about 30. They also had lots of fabric for sale on that day for $1 per piece (some were a yard or more). I also saw about eight dolls for sale, the type that crafters use, for $1 each. Some looked to be from the 1970s. Since I was low on cash and had my kids in tow, I just left without further pondering those items. My mind was already churning with ideas about altering the dolls and using the fabric. I figured I have enough supplies here to do stuff with and given the low cash situation I should just get the heck out of there, and fast, so I did.


Technorati Tags: , , , , .

Thursday, March 23, 2006

ATCs with me as a Poppet (TM)


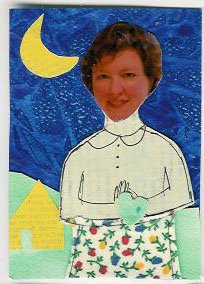
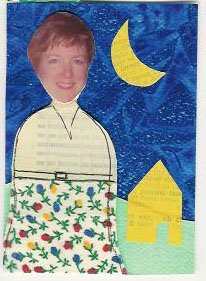
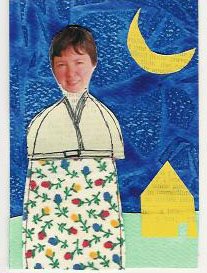
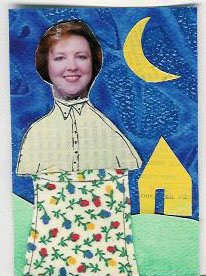
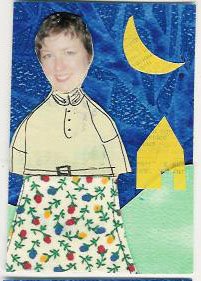
Here are the five ATCs that I made for a "Meet the Author" swap which was to feature a photo of ourselves on the ATC. Since I was reading Claudine Hellmuth's book "Collage Discovery Workshop: Beyond the Unexpected" in which she teaches her Poppet (tm) style of collage, I decided to make myself into a Poppet (tm).

I should state that some of these photos are up to three years old. I have a different hair style now and some of these photos are not flattering at all. I was using old photos that I had on hand already rather than making yet another project out of taking a new digital photo of myself, having it printed off at a store, etc. The reason that I didn't make a black and white photocopy of my photo to use for the ATC is that I feared my home photocopier would make inferior copies and because that printer is an ink jet and I didn't know if the ink would get wrecked.

Other than the first one I don't like the way the arms came out.


The technique for making Poppet (tm) collages is outlined step-by-step in Claudine Hellmuth's book "Collage Discovery Workshop: Beyond the Unexpected".


Technorati Tags: , , , .

Wednesday, March 22, 2006

Carol Duvall Show with Claudine Hellmuth

I was surprised to see Claudine Hellmuth on a Carol Duvall Show that aired yesterday (episode CDS-1916). TiVo recorded it for me and I was happy to find it sitting in my ‘now playing’ list last night. In this episode, Hellmuth demonstrated “photocopy printmaking collage”. This process is also taught in her book “Collage Discovery Workshop: Beyond the Unexpected” (which I own, enjoy, and have been using).


Here is the link to this episode's Carol Duvall show Internet archive. You can read the steps in the process and see color photographs of the steps, as well.

I was tempted to try this technique a few weeks ago after reading the directions in the book. I visited A.C. Moore and two Michael’s craft shops and could not find gum Arabic (a necessary ingredient for this process) in the fine art aisle where other products made by this company are sold (maybe they were sold out). So, I have not tried this process yet. I hope to try it in the future, though!

Technorati Tags:, , , .

Tuesday, March 21, 2006

My ATC: Sunday Picnic


The title of this ATC is "Sunday Picnic". This was made for a swap called "found photos". The swap hostess sent me some antique photos and I had to use an original photo in each ATC.

I decided to work on this lady but it proved to be so challenging that it gave me creative block.

Originally cropped the large photo one way and started the ATC but I didn't like it I decided to crop it down further. Rather than cutting it with straight lines I decided to use my tag shaped die cutter.

I liked the oak trees and the views of the park and the picnic table too much to crop them out and just use a close up of this lady.

Since this lady is at a park with a picnic table in the background, it seemed to me perhaps she was on a Sunday picnic. I also thought she was posing a bit such as perhaps she is posing for her lover.

I noticed her dress looks like a warm weather dress. I noticed that the trees were bare. I guessed this was a warm October day.

I used an Elizabeth Brownd rubber stamp to put images on the background paper which is handmade paper from India which I purchased at the craft shop. That paper has flecks of plant material in it, which may be hard to see on this scan. Perhaps you can see the brown leaf on the left side of the ATC? The browns in the ATC inspired the edging color which is rubber stamp ink.

I hand wrote on the card "October 20th, Picnic at the Park with S." on the upper corner, to try to explain that the ATC is memorializing an event (which I made up in my head).

I ended up liking the ATC in the end. Finishing up this ATC held me up with sending in the swap. This ATC took nearly a month to finish due to repeated creative block.

Technorati Tags: , , .

Excited to Receive Issue 3 of Art and Life Zine in Yesterday’s Mail

I was thrilled to receive the third issue of Art and Life magazine in yesterday's mail. I received this subscription as a Christmas gift from my husband.

I have been reading bits here and there as I can squeeze it in between other things I am doing.

What I love about this magazine, published by Teesha Moore, is that it focuses on creativity in general and has an 'anything goes' attitude. I find reading this zine very inspirational in that it makes me want to go make some art.

Technorati Tags: , , , , .

Monday, March 20, 2006

UTEE as Top Coat on ATCs

I am hosting an artist trading card (ATC) swap right now. I received a set of ATCs with a top coating which I had never seen before. It was clear and thick and had a kind of raindrop or smooth bumpy texture (it is kind of hard to explain it). After corresponding with the artist I found out it was Suze Weinberg’s UTEE, which is an abbreviation for Ultra Thick Embossing Enamel. The coating on these ATCs was a clear color and it was bumpy. I was told that one layer of UTEE was put on top of the ATCs.

I was at Michael’s this weekend with a 40% off coupon in hand and bought a large bottle of UTEE (regular retail $11.99).

Last night I tested it out on some finished ATCs that I had made that I thought were lacking something. It worked great! I love this finish as it makes the cards sturdier and makes them seem somehow more finished.

The other things that are needed are the Ranger ink pad (clear color) to use to adhere the embossing granules to, and a heat gun such as is used with embossing. I already owned the other two things bought previously with more of the 40% off coupons!

I put a layer on top of an ATC that I made with a base of watercolor paper and watercolor paint that was rubber stamped upon. I also put a coat on an ATC that I made which was collage of a tourist map of the city of Boston. That ATC was very ‘new’ looking and seemed lacking in something. The top coat of the heavy UTEE finishes off the ATC nicely.

Today my older son (aged 8) used the heat gun and did a top coat of UTEE on another of my ATCs and he had fun with it.

UTEE is my new favorite thing!

You can read more about some uses for UTEE, here.

Technorati Tags: , , , .

Saturday, March 18, 2006

My ATC: The Patriarch


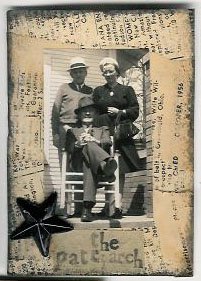
This ATC is called "The Patriarch". This was made in December 2005 for a "found photos' themed swap. The hostess sent me a bunch of antique photographs and we had to use an original photo as part of the ATC.

I thought that the elderly man sitting in the chair looked like the King of the family so I named this artist trading card "The Patriarch". He really seems to be in control of the family. Based on their body language, I am guessing that the woman is his daughter and the other man is her husband.

The background is made from an old Mechanix Illustrated magazine from the 1950s which is advertising jobs for men. I chose that intentionally as it represented men, men's careers and money making opportunities as the family's bread winners. I liked the color of the paper, due to the oxidation and the acid content of the paper. I used Claudine Hellmuth's masking tape technique as outlined in her book "Collage Discovery Workshop", combined with my choice to tear strips of the paper and to randomly glue them to the background card.

The text is rubber stamped. I wanted to be sure that my message that this man was the patriarch of the family was expressed to the viewer and final owner of the ATC.

I thought the ATC needed some other element to decorate it, but had to be careful about my choice. I needed something masculine. I decided to look through some buttons I own, because I thought an object with dimension would be better than another flat paper element. The star is a button which I bought in an inexpensive button assortment pack from the craft store. I cut the back off of it so it would lie more flatly and used Golden Acrylic Gel Medium Regular as the adhesive. I chose the star for three reasons: the color was right for the ATCs color scheme, the color is masculine, and because the star represents power and authority. The man who I call the patriarch is the ‘star of the family’. I thought it was a perfect addition to the ATC.

At that point the edges of the ATC looked bare. So, I finished the ATC by dragging the edges across a black ink stamp pad. Looking back, I now realize I could have also cropped the whole ATC down to a smaller size and mounted it upon a black background, so that the magazine ad background would have looked like a mat around a framed picture.

I like the simple color scheme of the grey tones, the beige colored paper and the black ink.

Technorati Tags: , , .

Friday, March 17, 2006

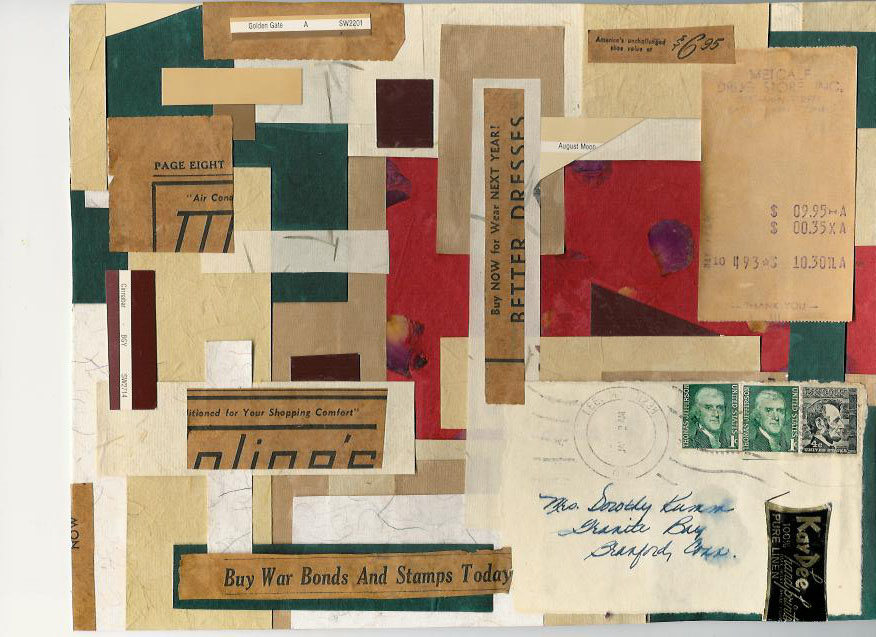
My Collage: Dada Inspired


This is a collage that I made. The style was inspired by a Dada collage which I saw in a book about the history of collage. Unfortunately I didn't note the title of the original work before I returned the book to the library.

What I was imitating was the use of blocks and geometric shapes. I mimicked the use of solid blocks of color. I changed it to be tones of color that I personally favored. Unlike the original I wanted to use some handmade papers from India which I purchased from the craft store.

Like the Dada collage I used bits of newspaper and other ephemera. The newspaper was from the 1940s and was something my grandmother had saved. The letter was my relatives letter. I loved the handwriting, the stamps, and the way the cancellation mark flows across the paper, so I decided to use that large part of it rather than tearing out just the stamps or using just part of the address. There is also a new paint chip sample piece. There is a cash register receipt from May 10, 1964 which my grandmother saved. There is also a tag from a linen towel from the early 1970s which my grandmother received as a gift but had never used. What I liked about the vintage ephemera was the color of the paper, I love the way the color of the paper changed as it aged. I also like the different fonts of the letters.
The size of this is 9 x 12 inches. I plan to frame this and hang it on my wall because I really like it.

Thursday, March 16, 2006

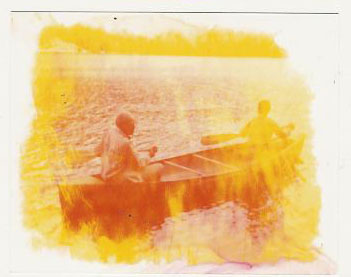
Canoe Trip: A Bleach Altered Photo


This was a regular color photo which was taken in the early 1980s.

I decided to experiment to see what would happen if the photo was left for a longer period of time, in the bleach and water solution.

As I have said before, you can watch the edges of the photo to see how much of the photo's color emulsion layers are being eroded by the bleach solution. This photo has quite a wide white border on it, which is just the white background paper.

You can see that all of the top blue emulsion is gone because not a trace of the blue is left in the photo.

Some of the second layer of red emulsion is also gone.

The pine trees in the background were green, originally. When the blue layer went off, they change to red. Since most of the red layer is gone from this photo, the trees are turning yellow.

The yellow streaking going across the canoe cannot be controlled. It just happens.

The strange red or pinkish colored mottled look near the bottom was caused by the photo being very wet and laying flat to dry while still very wet. What happened was when I laid the paper down to dry, the puddle was there. There must have been some chemical changes still occuring because more red emulsion lifted off the photo as it laid to dry. The red emulsion puddled there and since I didn't wipe it off, it dried in that way.

I learned through this process that if I don't want that effect to possibly happen there are a couple of things that I could do to stop it. One is to do two clear water baths, as I outlined earlier, but I later realized that perhaps the reader may assume was a typographic error on my part. It was not a mistake. Another thing that can be done is to change the first water bath frequently as the more it is used, the more bleach ends up in the water and the less that first bath will do to completely stop the process. Something else I tried was that after removing it from the second water bath, I rinsed it under a running faucet. Lastly, I shook the photo to try to get all the water off of the surface.

I also once tried blotting the front of the photo with a dry paper towel but found that sometimes doing that alters the photo further, by making color changes in the emulsion in the textured shapes that are in the paper towel. If you don't want a pattern put into the surface of the photo, don't do this. Then again if you want to press shapes into the photo, that could be an intentional thing to do.

Once I tried to speed the rinsing process by wiping my finger across the front of the photo while it was submerged in the clear water bath. I found out that the friction of my finger actually wiped away more of the emulsion, further altering the photo. What it did was wipe away the coloring of the image that was there down to all yellow and sometimes down to the base white color, erasing the image completely. This could be another thing to experiment with as it is possible to basically erase sections of the original image if you wanted to.

In this process everything happens quickly and little is truly under control. I don't feel in control of the process but mostly the faciliator of it and I never know what the final result will be. The finished result is not seen until the photo is completely dry.

Wednesday, March 15, 2006

Butterfly on Flower: A Photo Altered with Bleach


This photo of a butterfly on a flower in the garden of my former home was altered using the bleach and water process.

I removed the photo from the solution just before all of the blue layer of emulsion was gone. I wanted to see what the photo would look like if I allowed some of the blue layer to remain. I also wanted the butterfly to still have some color to it.

This was in the solution for a very short time, perhaps 15 seconds. The bleach has removed some of the blue layer but not all of it. Note also that this allows some of the green yucca leaves in the background to still appear to have green tones. You can see some accurate purple tones in the flowers in the lower left hand corner (this is the lavender/lavendula plant). You can see some mottled blue colors in the upper left area of the photo which 'just happened'.

The liatris flower which the butterfly is on remains white as it was in reality.

You can see that the edges of this photo retain the photographic image right up to the edge. This is because I removed it from the solution before the edges were bleached out.

Note that since the bleach did not affect the yellow layer very much, the yellow daylily blossom retains some of the a realistic pastel tone rather than morphing into that other, more shocking yellow tone. (See my other photos for examples of what I mean by that.)

Technorati Tags: , , .

Altered Photos of Flowers


Here is a photo that I altered with the bleach process. This is a photo that I took, of my organic flower garden at our last home.

I removed this from the bleach and water solution after the blue layer was gone. You can see that the red layer and the yellow layer of the emulsion is still there.

The yellow color is very bright and quite shocking if your eyes prefer pastel tones or the vintage look of sepia tones.

Technorati Tags: , , .

Tuesday, March 14, 2006

Contemplation: An Altered Photo


Here is a photo which I altered during my first bleach photo experiment.

Step 1: I cut the corners with a die cutter, to round them off.

Step 2: Immersed in warm water and bleach solution (approximately 5:1 ratio)until I saw the edges turning white, then removed and...

Step 3: Immersed in cold water solution, allowed to soak for about 30 seconds, then removed and...

Step 4: Immersed in cold water solution, allowed to soak for about 30 seconds.

Step 5: Removed and shook off excess water.

Step 6: Laid flat on paper towel to dry overnight.

I removed this photo from the water right before all the blue emulsion was off. The sky was foggy and grey, and the lake water was dark grey, so there was no blue to be removed from those, but you CAN see a little blue left in the skirt.

I could not control the way the photo was altered, such as having no control over the parts which are yellow near the bottom. The parts that are in the bleach solution longer get bleached out faster. I think that what happened with this was I put the photo into the bleach/water bath bottom side in first then got the rest of it submerged. If you want a more uniform look you will have to try to dunk it under the surface as fast as possible, all at the same time (if that is possible). If you casually plunk it in the water and leave it so that part of it is dry and floating on the top while the rest is in the solution then the photo will be greatly affected (less uniform in appearance).

One really fun part of altering photos with bleach is that you never know exactly what will happen during the process.

I like the fact that the only blue left in the photo is the skirt. Most of the colors of this photo are the yellow and red tones. Note that the edges are completely bleached out to the color white, which means that all of the photo's emulsion has been removed and what you see is actually the white background paper.

If you want the photo to have the edges all look like this, then you should cut the photo to its' final size before you bleach it. In other words if you like the effect on the edge having that white border effect, but you want the photo's finished size to be smaller, crop and cut the photo to size first, then do the bleach altering.

An example is if you want the corners to have a different edge than they have originally, do the cropping before you alter it.

I wonder what the effect would look like if one of the fancy design die cutters were used on it?

Technorati Tags: , , .

Monday, March 13, 2006

Had Enough of Pointed Party Hats

This weekend I took a 40% off coupon to Michael's craft store to buy a copy of Somerset Studios magazine, March/April 2006 issue. (The magazine costs $8 per issue! By using the 40% coupon it is less expensive than buying a subscription.)

I am only part-way through the magazine. I have a challenge for the publishers.

Can get do one issue that does not show any pointed party hats affixed to vintage or even modern pictures? Is that possible?!?

I am seriously considering writing them a short note with that challenge.

The more I see pointed party hats the more I hope that the fad ends. It was whimsical at first but when everyone is doing it, it becomes commonplace and is no longer funny.

I predict that some day people will look back on some of those altered faces and think, "Why was that done? I don't get it."

Sunday, March 12, 2006

Finished ATC Series: Vintage Boy's Toys

I had some fun making some ATCs this week.

I had taken some money that I received for Christmas and purchased some new, unmounted rubber stamps from a small rubber stamp making company who runs an eBay store. The brand of the rubber stamps is Mars Tokyo/ Adorned Surface/ Hissy Fit and I blogged about them in the past, here. You can see images of the stamps in that blog entry.

I had never used the stamps until this week, for this project. These stamps are great! They are high quality unmounted rubber stamps. My boys also love them.

The other day my older son and I woke up before my younger son. My son asked if he could do some rubbers stamping with me.

I took out a large sheet of watercolor paper which I had put some left over watercolor paint onto about a week ago. The color was a medium blue.

Using various dark shades of ink, I randomly applied rubber stamp images of vintage boy's toys all over the page. Some of the inks were pigment dye so they had to dry overnight.

The next day I randomly cut the paper into ATC-sized pieces. It was interesting to see what each ATC had on it. Some did have blank areas on it, that needed filling.

Today I spent about 15 minutes filling in the blank areas with the smaller sized toy stamps. While I did that both of my sons were using the stamps on white sheets of paper.

After I make the backs for them they will be ready for trading. Once I removed ones which didn't have good imprints, there are 17 left.

This is the second time that I have tried making a sheet of art and randomly cutting it into ATCs. This is fun!

I would like to add that although it may seem that I slapped this together, I can assure you that this took some time and thought. I didn't just go crazy and stamp in a messy manner. When I create individual designs which are detailed collages or are mixed-media, I can easily spend 45-60 minutes on each ATC. These didn't take that long, I estimate I spent about 2.5 hours making them, not including set up and clean up time. I guess 17 ATCs in 2.5 hours is pretty fast compared to 1 hour for one.

Okay, signing off now to go make the backs and to scan them.

Technorati Tags: , , .

Wednesday, March 08, 2006

Altered Book Article in a Local Newspaper

Today a local newspaper had a front page story about altered books. The focus was on their use in 6th & 7th grade public school classroom in a town called Sherman. The newspaper that ran the article is called Danbury News Times. Danbury is a city in Connecticut, United States. Here is the link to the online article.

The teacher had the students transform the old books into AB’s that ‘had a message’ plus had an aesthetic value.

I think it is great that altered books are being made in the classroom. It is a different way to express what a person has to say. The only thing I will add is that not all altered books have to have such strong messages nor do they have to all be ‘politically correct’ as the topics in the article are. Altered books can just be nice to look at or have less serious or outright humorous themes. However, I can understand that the teacher would ask the students to come up with a message or theme to get their creative juices flowing and/or to justify to the school that this is a worthwhile project.

Monday, March 06, 2006

Tried Altering Photographs with Bleach

Two nights ago I squeezed in a bit of art making. I experimented by altering photographs with bleach. I did this for about 20 minutes then laid the wet photos to dry overnight. I had a lot of fun doing this. My husband thought I was nuts. My friend arrived while I was doing this, and when I explained what I was doing this is her response, "And WHY are you doing this??". I replied, "for fun". I think she also thinks I am nuts.

I was busy all day yesterday and unable to play at making art until just before bed. I decided to make some ATCs. I intended to use the bleached photos. My older son joined me and made one very detailed ATC using collaged pieces of his favorite movie's toy product labels.

I experimented with adding color to the bleached photos using colored pencil and watercolor. I didn't love any of the results.

I then decided to bleach more photos. I looked through a stack of old photos and chose some to alter. This time I was altering someone else's photos that I got from Freecycle. That is a story for another day.

I worked at fixing up my Photoshop program. I have not had time, though, to test it to see if it is working or not. Once it is, I will upload some scans of my ATCs and the bleached photos.

Later when I have more time I will blog about the bleach method that I used. I used my own process but the inspiration and idea to do it came from a book that I am reading called "The Complete Guide to Altered Imagery" by Karen Michel. I have been reading a few pages a day before bed and skimming through the photographs for inspiration. This book is full of inspiration and ideas!

Friday, March 03, 2006

I Miss Making Art

Since I mailed out three ATC swaps on February 24th, I have not played at making art.

I have been busy doing stuff, going to meetings, homeschooling my kids, and cleaning the house. I was so busy with that stuff that I didn't have any desire to make art.

Now I have the itch again to get back to it.

We were watching the movie "Phantom of the Opera" last night (again) and the visuals are so gorgeous that I was thinking about making a series of ATCs with a Phantom of the Opera theme. I am pondering hosting an ATC swap with this theme. I don't quite know if I can make art that is as beautiful as what I am imagining in my head.

Also on my 'to do' list is to take the scans of the ATCs that I mailed out and to post them on this blog. I am having a problem with Photoshop right now that prevents me from converting the scanned images to nice little files for uploading.

Thursday, March 02, 2006

Weird Coincidence Beeswax Collage & Claudine Hellmuth

I tried beeswax collage once and it failed. I was going by memory on the directions and I was not using a quilting iron or a melting pot (which is why it failed).

Last night I was thinking I should try beeswax collage again. I was inspired by some photos that a person on a chat list shared with the chat group which showed some of her first time artwork which were two beeswax collages. Then I was inspired by a person who was brand new to ATCs who made lovely pirate themed beeswax collage ATCs.

On one chat list a person asked about the technique to use and someone responded "go read Claudine Hellmuth's book titled Collage Discovery Workshop".

I own that book but hadn't looked at it in a while. So to make a long story short last night I took the book with me to bed and read the chapters about beeswax collage. I immediately began wondering when I could get my hands on a quilting iron and a melting pot so I could start creating.

I then turned the TV on to see what TiVo had for us to choose from to watch on television. There were two Carol Duvall shows that recorded yesterday. The first show I turned on gave a preview of a beeswax collage technique! I then recognized some of the collages on display as being Claudine Hellmuths (before Carol Duvall announced that the guest was Claudine Hellmuth).

The Carol Duvall show has a website hosted on HGTV which shows all the projects demonstrated on the show. Directions for every project are given in detailed text and accompanied by step-by-step photographs. Here is the link to the show with Claudine Hellmuth and beeswax collage. It is episode CDS-1756.

I can't wait to try doing beeswax collage with 'the right technique'.

, , .

Wednesday, February 22, 2006

Worked on Poppet ATCs

I squeezed in some time to make and finish five ATCs for a swap yesterday. The swap is one in which we have to use an image of our face (at least) on the ATC. The ATC is to contain some information about us, so we can see who the others are.

I decided to make mine with Claudine Hellmuth’s poppet style, which I had wanted to try (but not necessarily with my own face).

Yesterday I was able to work on these while my children played with their friend who was visiting. I did some constructing of collage and had to let the acrylic gel medium (adhesive) dry while we ate dinner.

I squeezed in another 20 minutes or so before bedtime. I noticed the parts which were fabric would need to dry overnight.

This morning I trimmed the edges of the ATCs. Five are finished. I think I should keep one of them, so I will have to make at least one more with my own head on it. (That means I have to go back to the photo archives to find another old photo. I am using photos which are in my ‘duplicate photo’ box, back from the ‘old days’ when we’d print off our photos and have two sets made.)

After these ATCs are scanned and ready for uploading, I will share them with you.

I will say this: the beginning part when I had to prep the watercolor painted backgrounds was slow going. I like to work on things and do them all at once. I don’t like waiting for the paint to dry. I chose to make all of these with the same general background and the same clothing on my poppet. In the end the construction was like an assembly line which went fast and really was so much easier than making a brand new design for each ATC.

This is the book that I own which I used for directions on how to make poppets. It is called "Collage Discovery Workshop: Beyond the Unexpected" by Claudine Hellmuth.


Technorati Tags:, , , .

Tuesday, February 21, 2006

Learned Some Lessons about Paint and Adhesives; Made ATCs Yesterday

Yesterday while making ATCs I learned some lessons:

1. Don't use india ink on something then put acrylic paint or acrylic glaze on top, because it smears the (dry) ink and ruins the ATC.

2. Don't put acrylic glaze over the top of watercolor paint. The glaze activatated the watercolor paint, lifted it up and smeared and ruined the design. I was able to quickly rub off all of it and I will see if I can salvage this.

3. My water based adhesive (Dab N Stik), was sometimes a problem when I applied acrylic paint, acrylic paint wash (water mixed with acrylic paint), and acrylic glaze (tinted and not tinted) on the surface. The paper underneath lifted up from the base, and sometimes bubbled. Sometimes when it dried it ended up being alright, while other times, the bubbles remained. I am going to now try to use acrylic gel medium as the adhesive and see if the acrylic products on top or just the wet products on top don't affect the stuff underneath as much.

I was able to spend some time yesterday making ATCs. I finished three ATCs for a swap that mandates the use of a map in the background. I have to finish one more before I can mail out the swap to the hostess. I ran into some of the above challenges so this is taking longer than I anticipated.

I began making ATCs that include my photo on them. I ran into some problems so this is taking longer than anticipated.

For fun, while the other stuff was drying, I tried something new for a swap which I didn't officially sign up to participate in. If these ATCs turn out well then I will sign up and mail them right in. This is a process by which you take white glue and tint it with black ink or black acrylic paint. You then squeeze it out in a pattern or in a drawing onto watercolor paper. After it dries overnight you paint inside the lines. It ends up looking like a stained glass window (but not transparent). My younger son joined in with me on step one of the process last night. Today he and I did some painting on the insides of the black lines. My older son got interested today and he did step one this morning, and it is drying now.

One thing that is not fun is when I sign up for a swap then have problems with the ATCs and am rushing to meet a deadline. I find it more fun and freeing to make the ATCs first then if they work out and look good I sign up and mail them right in.

Monday, February 20, 2006

Making ATCs Again

After a full seven days of no-art making, I had about an hour to work on ATCs yesterday.

I keep being asked how I have time to do this. As I just said I had not had time in the last week to do any artwork.

Yesterday I had an hour while my husband was on an errand with my children. I chose to do more work on some ATCs which I started over a week ago. I did not feel they were finished looking enough. These ATCs are for a swap which mandates that a map be used as part of the background. I thought the ATCs looked too plain and bright and new looking. I painted the entire surfaces with tinted acrylic glaze paint. I also added some rubber stamp impressions to them (using acrylic paint not ink). I put some acrylic paint on the borders. They are not finished yet but needed to dry before further embellishment is able to be done. I also had to clean up in order to play a game with my son and then eat dinner.

I had expected to be able to make more art over the weekend but I chose to blog and do some other projects instead, as well as some house cleaning and I did all the laundry.

Before bed, I have been reading these two books, for inspiration and ideas.

The Complete Guide to Altered Imagery by Karen Michael


Collage Discovery Workshop: Beyond the Unexpected by Claudine Hellmuth:


I am getting ready to make some ATCs for a swap which must feaure a photographic images of my face. I think I am leaning toward making poppet like people as Claudine Hellmuth does (which she illustrates in the above book).

You can view some images of Claudine Hellmuth's poppets here, on her website.

Technorati Tags:
, ,

Tuesday, February 14, 2006

Make the Art You Like

I had some creative block on Sunday while making ATCs. I was snowed in due to the big blizzard that hit my area.

As I made ATCs for a swap I was worrying that some may not like my choice, or think they were too plain, or not embellished enough. The worry of it hindered my ability to have fun. I gave up a couple of times and walked away to do other things.

It was a shame that I felt that way because I had all the time I wanted that day to make art but was unable to do it.

Last night before bed I began re-reading some articles in the most recent issue of Art and Life (a zine published by Teesha Moore and Tracy Moore). I was reading about making art that makes us happy rather than feeling constrained by worry of what others will think. I also chuckled at one part where it was mentioned that perhaps we should move away from trying to copy what others are doing, such as having our finished pieces all look like they came out of the pages of Somerset Studios magazine.

Recently I made a lot of ATCs from ads in the pages of Mechanix Illustrated magazine. I know they are different than what most people are making. However they are vintage, authentic vintage at that, which is very trendy at this point. I was surprised that I am having a hard time arranging private swaps for these. I thought more people would:
1. compliment me on them
2. want to own them

Oh well. I had fun making them and I like them so that is all that really matters. I am trying not to think about the fact that people must not like them!

Sunday, February 12, 2006

Don't Use Construction Paper!

On an ATC chat list there was a discussion of poor quality ATCs. I saw a couple of people mention construction paper was being used for making ATCs. I have not received any construction paper ATCs in the swaps that I participated in. I was really surprised. I was surprised to think that maybe someone doesn't know how poor quality construction paper is?

I think that construction paper should be avoided at all costs. First off it fades unbelievably over time. If it is even near the sun it will fade. Some people use it in place of 'solar paper' for sun print making!

Construction paper has a high acid content. It also just falls apart over time even if it is not touched or handled roughly. I have witnessed this first hand.

There are a lot of cheap papers that can be bought in bulk at the craft store that are acid free. Now I am not saying that I always use acid free paper because I don't, because I often use old original papers from magazines or newspapers or books, and those do have acid, but when I buy new store bought paper (colored paper or card stock), I buy acid free. The craft stores also sell lovely handmade paper which is acid free and affordable. I have bought colored cardstock for as low as 2 cents per sheet which is pretty darn cheap, isn't it?

So I say to avoid construction paper for making ATCs or anything that you want to keep.

Construction paper may be alright for something like crafts for preschool aged children which a parent intends to throw it away after a shore while, but that is about it.

Friday, February 10, 2006

Fun Painting Night

Today was a full day of homeschooling the kids and errands. I am caught up on laundry and the kitchen counters aren't cluttered. I have not had a serious art making session in quite a while. I announced to my husband that tonight was ATC making night. He did not protest which I very much appreciated.

The kids were busy playing after dinner. I pulled out some map-themed ATCs that I made. One could call these finished. They are very clean looking collages. I am not happy with them as they feel too new and too bright and they don't feel finished TO ME. I decided to paint them in some way to change the look of them.

I was very impressed by some of the map ATCs that Sharon made. Sharon is an artist from Australia who shares scans of her artwork with anyone who is interested, via her Yahoo Group! She is also a member of some of the chat lists that I am a member of. I took a look at her scans again for some inspiration and set to work.

I pulled out my acrylic paints. These are little 2 ounce bottles that cost under $1 from the craft store. I started by adding water to one color to make an acrylic wash. I was not happy with the effect so I wipded it off with a paper towel. Some of the color had already sunk into the paper. I then pulled a different color and washed over that. Then I wiped that off.

I played around with the ATC and finally made a portion of the map disappear by painting over it. I then used a rubber stamp to print acrylic paint onto a part of the ATC. I then did a little rough hand painting. I painted a border around it. I think it is done now.

I also should mention that it is not typical that I am left alone in a room to do this. Tonight I was alone so I switched the TV off of the news (very uninspiring to me) and scrolled down through the channels. I found a VH1 Classic channel which was playing all the music videos from the very early 1980s. Those were popular when I was a young teen. I heard songs I have not heard in 20 years and was surprised that I remembered all the words. These light hearted songs were very inspirational to me.

Rather than work with such detail on the other map ATCs I decided to paint backgrounds. Using purples, blues and greens I painted some backgrounds. When the paint ran out I cleaned up and then changed to a different color palette of orange, tangerine, pale yellow, and white. I painted over 30 ATC backgrounds, using pre-cut cardboard which are from recycled food and other consumer product containers. I suddenly felt the canvas was too small so ran to my paper storage shelf in the basement to get a piece of 8.5x11" canvasette. I painted that up then I went back to making more ATC backgrounds. I have 44 backgrounds finished!

I had a blast!

I plan to use some of these backgrounds to make ATCs for an affirmation swap.

As I write this a huge snowstorm is heading our way. If it hits as anticipated some of my plans for the weekend will be cancelled. I am planning to spend that time hibernating in the house, having fun with my kids and making more art!

Thursday, February 09, 2006

Article about ATCs in The Minneapolis Observer

Here is a newspaper article about artist trading cards. This was published in The Minneapolis Observer on December 11, 2005 and was written by Carrie Mercer.

This is a nice introduction to artist trading cards.

Wednesday, February 08, 2006

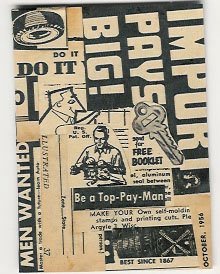
My ATC: Import Pays Big


Title: Import Pays Big

This is another ATC made from ads from ads in a 1956 Mechanix Illustrated magazine.

Tuesday, February 07, 2006

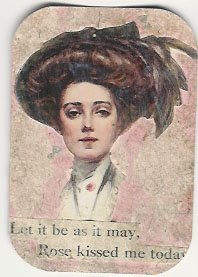
My ATC: Let It Be As It May, Rose Kissed Me Today


Title: Let It Be As It May, Rose Kissed Me Today

I made this ATC from images and text cut out of a book that I bought at the dollar store. I used three colors of tinted acrylic glaze paint to alter the appearance of the original papers.

Monday, February 06, 2006

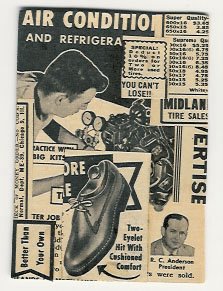
My ATC: You Can't Lose


Title: You Can't Lose

Another ATC I made from ads from ads from a 1956 Mechanix Illustrated magazine.

Saturday, February 04, 2006

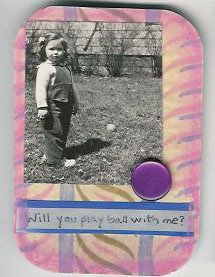
My ATC: Will You Play Ball With Me?


ATC Title: Will You Play Ball With Me?

I made this ATC in December 2005 as part of a "Found Photos" swap. I have no idea who this little girl is but I thought she was so cute!

I could not think of a way to keep the ball in the photo and not have the ball addressed. I thought it was clear from the expression on her face that she wanted someone to play ball with her. Actually she was probably already in the process of playing ball with someone and it appears to me that the adult who took the photo called her name and she turned to look and that is when the picture was snapped.

I used a gift wrap paper from either the 1940s or 1950s which I found new and unused in a stash of papers that my grandmother was hoarding.

I decided to further embellish the ATC with a button which I thought looked like a ball. I cut the back off of the button to make it lie more flat and use Golden Acrylic Gel Medium to adhere it to the ATC.

I decided to hand write "Will You Play Ball With Me?" as I wanted that text to appear rather than have it inferred.

I rounded the corners using a die cutter. I love that little tool!

I thought it needed something else so I added color to the edges by dragging the ATC edge over a rubber stamp ink pad.

This ATC was swapped out and I hope the recipient enjoys it.

Example of Making a Craft vs. Making Art

On an online chat list about ATCs, a discussion about quality of ATCs and the idea of a craft vs. ‘making art’ was discussed. There were some very defensive people contributing and the topic got heated. I felt that the people who used scrapbooking materials and pre-made things were being defensive and said that indeed they were making art.

I am reading Claudine Hellmuth’s “Collage Discovery Workshop: Beyond the Unexpected” right now.


A major part of this book is about her unique art ‘thing’ she created which she calls Poppits (and she has registered this word as a trademark), which are collages with a unique style. In the book we are taught how to make these on our own. IMO this is art. If you want to see what a Poppit is, go here.

Even if we copy this method with our uniquely selected raw materials and use her directions and our own photos it is still art, in my opinion.

Recently I was on Claudine Hellmuth's website and see she is now creating unique pieces of Poppit art for people using their own face photos. Good for her for finding a way to make money by selling inexpensive and unique pieces of Poppit art.

Today I learned that she has now created a pre-made Poppit artwork bases to be sold for use in scrapbooks. IMO anyone who uses that is making a craft. The products from what I read online on her blog, are predesigned people/bodies that scrapbookers then paste a photo of their family or friend’s head onto. There are also premade backgrounds. Actually these remind me of colorforms---the child’s toy where there is a background and then you put pre-made forms onto it to create a new composition of your own design.

Anyway I thought that was a perfect example of making a craft vs. making an individually, custom designed piece of art and just had to share that. In the past some people had a hard time articulating what a craft was vs. making art.

Just want to also make it clear I am not putting down Claudine Hellmuth in any way, or even anyone who uses the Poppit products. I just think it is a great example of the difference between a craft and making art.

What are your thoughts?

Friday, February 03, 2006

Sneaking in Time to Make ATCs

Two days ago while my son was doing some of his homeschooling in a workbook I took a set of colored chalk out of the closet to experiment with. I bought this four or five years ago to make art with my children.

I played around making some pictures and some background colors. I think I will use some of these backgrounds for the "Affirmations Swap" which the ATC World Yahoo Group! has.

I also tested what would happen if I used colored Sharpie markers on top of the chalks. It works perfectly. I will use Sharpies to write the affirmation statement onto the chalk-backgrounds.

I also have spray fixative here which I bought for about $5 at Dick Blick Art Shop a few years ago. The fixative must be used or else the chalk smears.

That little experiment and play time was done in about 15 minutes.

(Side note yesterday my kids begged to make art with the chalk. They spent an hour making different pictures in their journals. I need to put the fixative on these. They really enjoyed using the chalk. It must have been two years since they used this chalk, what a shame. I need to make more time in our day to do art with the kids. Lately their noses are to the grindstone doing academic work.)

Last night after my kids went to bed I sat in bed and began working on ATCs for a swap which features maps. I looked through a book from the 70s which is a wine atlas. I spent about 90 minutes making six ATCs. I put a lot of thought into which map would be sized nicely for the ATC size and also which part of the map would look interesting on the card. I then cut out tiny wine labels of that region and added them to the ATC.

This morning when I looked at them they seemed plain. I am now not sure if these are 'done' or if I can figure out what else to do to them to enhance them.

There have been discussions of the quality of ATCs on one of the chat lists that I am on and the concensus is that no one likes ATCs which appear to be 'thrown together'. Simple collages seem to be the culprit of most of the complaints. I wonder if someone may look at mine and think they are 'thrown together'. They don't have lot of embellishments on them such as fibers hanging off (as I see no reason to do that that makes logical sense), but I did put a lot of thought into these. I will put them away for a few days and ponder what else I could do to them to jazz them up. However there is also the idea that the minimalist approach of appreciating a beautiful, detailed colored map which features a specific wine region and shows a wine label from that region is fine just as it is.

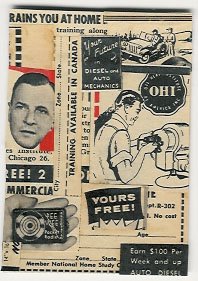
My ATC: Yours Free


Title: Yours Free

Another ATC I made from ads from a Mechanix Illustrated magazine from October 1956.

Today this is being traded out! I am glad it found a home with someone who will appreciate it.

Thursday, February 02, 2006

What to Do With Unwanted ATCs?

If you participate in ATC swaps initiated via the Internet at some point you may receive an ATC that you don’t care for.

You may also participate in “blind swaps” with one person and again, you may end up with ATCs that you don’t like or love.

Perhaps after collecting ATCs for some time you will want to downsize your collection and keep a smaller number.

There are a few options to pursue.

There is a relatively new Yahoo Group! Called “2ndGenATC” in which member’s trade ATCs with each other. There are online photo albums that we can use to display the ATCs that we would like to trade. We simply scan the ATCs that we don’t want and upload them. Most people also upload some images of our own ATCs in case a person wants to trade for those, to widen our selection. Members contact each other to make arrangements.

The newest fun thing that “2ndGenATC” is doing are “Art Boxes”. These are boxes which have at least 25 ATCs in them that are mailed to different members. When we receive the box we have the pleasure of looking at all the ATCs 'in person' and we decide if we want to own any of them. We then swap into the box, ATCs that other people created or our own ATCs. I received one of these Art Boxes two weeks ago and picked eight ATCs to keep.

Some people are lucky to live in areas where people are making ATCs and doing in person “meets”. People gather at a spot and show the ATCs that they want to trade and make face to face trades. From what I read of the history of ATCs this is the way the movement started. I am not lucky enough to live in a place where people are doing this. The nearest meet-up to me was 4 hours away! I really like seeing the actual ATC before I make the trade. Scanning is not always an accurate representation of the ATC. I have seen examples of the scan not doing the actual ATC justice and other times when the scan looked great but the actual ATC looked inferior.

Some people are afraid to join a ‘second generation’ trade group as they say they fear seeing any of their own ATCs as ‘unwanted’. I agree that if a person is going to be upset at the idea that someone doesn’t like their ATC enough to keep it that they should not join the list. Those of us on the list are of a different mindset. We feel that not all people like all forms of art and that it is possible that we think we did a good job on something and we like it but that someone else may not like it. We would rather have our art in the hands of someone who appreciates it rather than thrown in the garbage or kept and perhaps even loathed by someone. I also know that if I ever see any of my own ATCs up for re-trade, I will trade for them myself, because I like all of the ATCs that I swap out and I even regret giving some away! To think that an ATC which I love is not appreciated by the owner is bothersome to me so I’d rather own it myself or have someone else own it who appreciates it.

Discussions about this topic have gone on with regular ATC trading groups as well as on the "2ndGenATC" Group.

Once I asked if people thought that other people's ATCs should be sent to other people as "random acts of kindness" (RAK). I received not one positive response to this question. The overall attitude was to deem the ATC as junk and to send someone junk was not nice or "kind" at all. I felt that just because I didn't like the ATC myself didn't mean it was "junk". I also felt that a RAK isn't offically defined as sending my own art to someone else. Sometimes the RAK that is received are base materials or even cut-out's from magazines to be used in collage work (someone may think THAT is junk), who knows.

I recently did a 2/2 trade with a newbie to ATCs who lives overseas. I decided to add to the envelope, two ATCs that other people made to help her build her collection. I don't think there is anything wrong with that!

Yesterday I browsed the photo albums of the second generation group and saw six ATCs that one person is getting rid of that I wanted. I am waiting for that trade to be confirmed. I hope it comes through!

I also can’t wait to receive my next Art Box. I enjoyed the Art Box more than themed swaps that I have entered recently because I get to preview the ATCs before choosing which I want to own. I have been making more ATCs in anticipation of receiving the next Art Box.

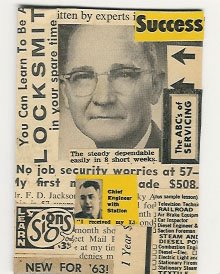
My ATC: Success


Title: Success

Another ATC made from ads from a December 1962 Mechanix Illustrated magazine.

Wednesday, February 01, 2006

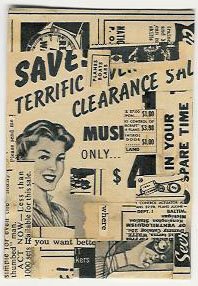
My ATC: Terrific Clearance Sale


Title: Terrific Clearance Sale

This is another ATC made from ads from the October 1956 Mechanix Illustrated magazine. These ads focus on buying items at a discount. I love the drawing of the woman.